10 Easy Steps to Put a Quilt Cover On
If you’ve ever wrestled with your bedding, trying to figure out how to put a quilt cover on without ending up frustrated and sweaty, you’re not alone. Many people struggle with this deceptively tricky task, often turning it into an all-out battle with their comforter.
Whether you want a crisp, hotel-style finish or just want to make your mornings easier, finding the best method to put on a quilt cover can feel like a game-changer.
Putting a quilt cover on your comforter is simple! Start by gathering your supplies and ensuring the cover’s the right size.
Lay the cover inside out on a flat surface and smooth out any wrinkles.
Align your comforter with the cover’s corners and tuck it in snugly.
Once it’s secure, flip the cover right side out.
Adjust for a neat finish, and you’re all set! Stick around to investigate more tips for a perfect fit.
Key Takeaways
- Gather all necessary supplies, including the quilt cover, comforter, and safety pins or clips. This helps make the process smooth and easy.
- Lay the quilt cover inside out on a flat surface. Make sure it’s wrinkle-free and ready for the comforter.
- Align the comforter corners with the quilt cover corners. Tuck in the ends so you get a snug fit.
- Secure the comforter using ties, buttons, or clips. This keeps everything in place and prevents shifting.
- Shake the quilt cover lightly to help settle the comforter. Adjust things as needed for an even, polished appearance.
How to Easily Put a Quilt Cover on Your Comforter
Putting a quilt cover on your comforter isn’t as challenging as it might seem. First, consider the comforter types you have; whether it’s down, synthetic, or a weighted blanket, the method is similar.
Start by laying your quilt cover inside out on a flat surface. Next, grab your comforter and align one end with the cover’s opening.
Lay your quilt cover inside out on a flat surface, then align one end of your comforter with the cover’s opening.
Roll the comforter tightly towards the opening, almost like a burrito. This helps you fit it inside more easily.
Once you’ve rolled it up, flip the quilt cover over the comforter and unroll it as you go. Be mindful of your fabric choices. Some materials, like cotton or microfiber, can be slippery. Others, like linen, may cling a bit more.
Finally, adjust the comforter inside the cover, making sure it sits evenly. You’re all set to enjoy your refreshed bedding!
Gather Your Supplies First
Before you plunge into the process, it’s vital to gather your supplies. Start with your quilt cover and make sure it’s the right size for your comforter.
Pay attention to fabric types, as materials like cotton or microfiber can influence how the cover feels and looks. Next, check out the quilt patterns. Whether you prefer florals, geometrics, or solids, choose a design that complements your decor.
You’ll also need safety pins or clips to secure the corners, ensuring that your comforter stays in place once it’s inside the cover.
A large, flat surface will help you spread everything out, making the task easier. Finally, don’t forget a bit of patience. It’ll make the process smoother.
With your supplies at the ready, you’re set to tackle putting on your quilt cover with confidence!
Choose the Right Quilt Cover for Your Comforter
Choosing the right quilt cover for your comforter can greatly boost your bedroom’s aesthetic and comfort.
Start by considering fabric types. Cotton is breathable and easy to care for, while linen offers a relaxed, textured look.
If you prefer something more luxurious, opt for silk or satin for a smooth finish that feels great against your skin.
Next, think about color choices. Do you want to create a calming atmosphere with soft neutrals, or are you aiming for a bold statement with vibrant hues?
Remember, the right colors can elevate your mood and tie the room together.
Don’t forget to check the size of your quilt cover to verify it fits your comforter snugly.
Ultimately, take your time to find a combination of fabric and color that reflects your personal style and makes your bedroom a cozy retreat.
Lay the Quilt Cover Inside Out on a Flat Surface
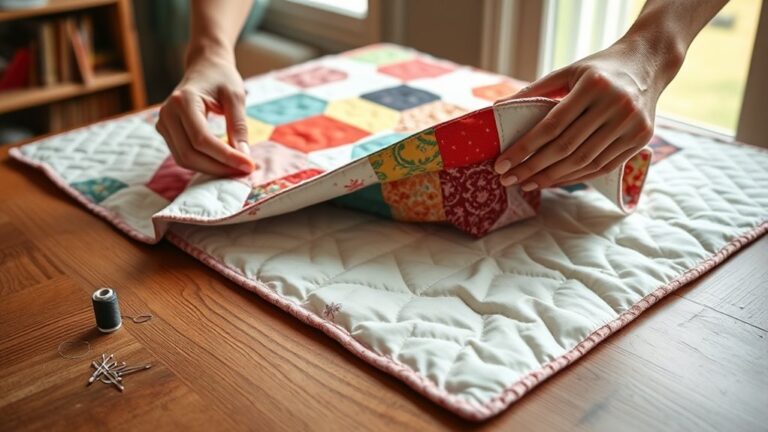
Before you get started, go ahead and find a clean, flat surface—like your bed or even the floor if it’s tidy. Lay your quilt cover out flat, but make sure to turn it inside out first. That way, you won’t risk getting any dirt or dust on your comforter as you work.
And here’s a tip: take a moment to smooth out any wrinkles in the quilt cover now. Trust me, doing this little bit of prep makes everything so much easier when you’re putting the quilt together later on.
Choose A Clean Area
To start off, find a clean, flat surface where you can easily manage your quilt cover.
A tidy environment makes the whole process simpler and more enjoyable.
Whether it’s your bed, floor, or a large table, make sure the area is free from clutter.
This way, you won’t have to worry about dust or dirt getting onto your quilt cover.
Here’s a quick checklist of what to take into account for your clean space:
| Surface Options | Cleanliness Tips | Additional Items |
|---|---|---|
| Bed | Vacuum beforehand | Extra pillow |
| Floor | Dust mop the area | Fabric spray (optional) |
| Table | Wipe with a cloth | Quilt clips (optional) |
Creating a clean area sets you up for success!
Smooth Out Wrinkles
Often, you’ll find that laying the quilt cover inside out on a flat surface helps smooth out wrinkles more easily. Start by spreading the cover flat, ensuring there are no folds or creases.
If you notice stubborn wrinkles, consider using gentle ironing techniques. Set your iron to the appropriate fabric care setting for the quilt cover’s material, whether it’s cotton, polyester, or a blend.
Lightly press the iron over the fabric, moving in smooth, straight motions. Avoid staying in one spot too long to prevent damage.
Once you’ve finished, give the cover a light shake to settle any remaining wrinkles. You’ll be well on your way to a perfectly smooth quilt cover, ready for use.
How to Slide Your Comforter Into the Quilt Cover
Now that your quilt cover is ready, let’s get your comforter inside. First, grab your comforter and line up its corners with the corners of the quilt cover. This helps everything fit just right. Once you’ve got the corners matched up, go ahead and tuck in the ends. If your quilt cover has ties or buttons, use them to secure the comforter so it stays perfectly in place.
Prepare The Quilt Cover
Sliding your comforter into a quilt cover can seem tricky, but it’s easier than you might think.
Start by choosing the right quilt cover materials, like cotton, linen, or microfiber.
Each has its own fabric care requirements, so check the labels for washing instructions.
Before you begin, turn your quilt cover inside out and lay it flat on a clean surface.
This way, you’ll avoid any tangles or twists while inserting your comforter.
Make sure the opening is easily accessible, and if your quilt cover has ties or buttons, leave them undone for now.
Once you’re set up, you’ll be ready to slide your comforter in smoothly, ensuring a snug fit for ultimate coziness.
Align Comforter Corners
To align the corners of your comforter with the quilt cover, start by holding the comforter in one hand and the quilt cover in the other.
Position the comforter so that its corners are easily accessible. Slide each corner of the comforter into the corresponding corner of the quilt cover, making sure you get a snug fit.
As you do this, check for proper corner alignment. Each corner should sit neatly inside the cover.
If the corners aren’t matching up, adjust them gently until they fit perfectly. This step is essential for a smooth and tidy appearance once you finish.
Taking your time here will improve how the comforter fits within the quilt cover, which will make it easier to manage later.
Tuck And Secure Ends
With the comforter corners securely in place, it’s time to tuck and secure the ends of the comforter into the quilt cover. Start by using simple tucking techniques: grab one end of the comforter and gently push it into the cover, ensuring it’s aligned with the edges.
Repeat this on the opposite end, making sure both ends are evenly tucked.
Next, employ effective securing methods. You can use ties or buttons located inside the quilt cover to keep everything in place.
If your cover doesn’t have these, a few strategic folds at the opening can also help.
Finally, give the comforter a good shake to distribute the filling evenly, ensuring a smooth, cozy finish.
Secure the Comforter Corners to Prevent Shifting
As you secure the corners of your comforter, you’ll notice how this simple step can prevent shifting and keep your bedding looking neat.
Using corner clips or comforter ties can make a huge difference. If your quilt cover has built-in ties, use them to fasten the comforter securely.
Alternatively, fabric clips or quilt clamps can also work wonders to hold everything in place.
Here are some options to evaluate:
| Method | Description |
|---|---|
| Corner Clips | Keep corners anchored and prevent movement. |
| Comforter Ties | Use built-in strings for a snug fit. |
| Fabric Clips | Easy to attach and remove as needed. |
| Quilt Clamps | Hold everything tight for a smooth finish. |
| Combination | Use multiple methods for extra security. |
Flip the Quilt Cover Right Side Out
Great! Now that the corners are all secured, you’re ready to flip your quilt cover right side out. Just find the opening of the cover—this is where the magic happens. Give the cover a good shake, letting the fabric unfold naturally. This little trick really helps everything sit neatly when you slip it over your comforter.
Identify Quilt Cover Opening
To successfully flip your quilt cover right side out, first locate the opening, which is usually found at one end.
This opening allows you to insert your comforter types easily.
Understanding quilt cover materials can help you choose the right one for your needs.
Check for buttons or zippers at the opening.
Verify the opening’s size aligns with your comforter.
Look for any tags that indicate the top or bottom.
Feel for any seams that may help guide you.
Ensure the opening is clean and free of debris.
Once you identify the opening, you’re ready to proceed with flipping the cover and getting your quilt ready for use!
Shake to Unfold Fabric
With the quilt cover opening identified, you’re ready to flip it right side out. Grab the cover by the opening, holding it up with both hands.
Give it a good shake to help the fabric unfold smoothly. This simple action is one of the best unfolding techniques, ensuring you don’t struggle with any creases.
As you shake, be mindful of the fabric care instructions. Some materials may require gentler handling, so always check the label if you’re unsure.
Once it’s fully unfolded, check for any twists or wrinkles. If you spot any, shake it again or gently tug on the corners to straighten it out.
With the quilt cover now right side out, you’re one step closer to dressing your quilt beautifully!
How to Smooth Out Wrinkles in Your Quilt Cover
How can you effectively smooth out those pesky wrinkles in your quilt cover? Don’t worry; you can tackle this with a few simple steps.
Tackle those pesky quilt cover wrinkles effortlessly with these simple, effective steps for a fresh and inviting look.
Here’s how to guarantee your quilt cover looks fresh and inviting:
- Use a steamer: A handheld steamer works wonders for quick wrinkle removal.
- Iron on low: If the fabric allows, gently iron the cover on a low setting for a crisp finish.
- Damp cloth method: Lightly mist the cover with water and let it sit for a few minutes before smoothing it out.
- Tumble dry: Toss the cover in the dryer on low heat with a damp cloth for a quick refresh.
- Hang to dry: If you wash it, hang it up immediately to minimize wrinkles and take care of the fabric.
Adjust the Comforter Inside the Quilt Cover
Adjusting the comforter inside your quilt cover is crucial for achieving that cozy, polished look.
Start by holding the corners of the comforter and the quilt cover together, guaranteeing they align properly.
Depending on your fabric types, the comforter might shift more easily in some covers than others.
So, be mindful of this as you work.
If you’re using a heavier comforter, like a down-filled option, you might need to make a bit more effort to distribute the weight evenly.
Gently shake and fluff the comforter as you adjust it, making sure it fills the corners of the cover.
For lighter comforter weights, you can simply smooth it out with your hands.
Once it’s well-adjusted, take a step back to check the overall look.
A well-adjusted comforter not only improves your bedding’s aesthetic but also guarantees comfort when you snuggle in at night.
Enjoy Your Cozy Comforter!
Now that your comforter is snugly settled inside the quilt cover, it’s time to enjoy that cozy comfort. The right quilt cover can transform your bed into a sanctuary, combining style and warmth.
Transform your bed into a sanctuary of style and warmth with a snug quilt cover, perfect for cozy comfort.
Welcome the cozy fabrics that wrap you in softness. Let seasonal patterns add a splash of personality to your space.
Here are a few ways to improve your cozy experience:
- Layer with soft throws for extra warmth.
- Use decorative pillows to create a welcoming vibe.
- Experiment with different textures to keep it interesting.
- Keep a book or a warm drink nearby for those cozy nights.
- Adjust lighting to create a soothing atmosphere.
Frequently Asked Questions
How Often Should I Wash My Quilt Cover?
You should wash your quilt cover every one to two weeks, depending on usage.
If you sweat at night or have pets, you might want to wash it more frequently. Always check for stains and treat them with proper stain removal techniques before tossing it in the laundry.
Regular cleaning not only keeps your quilt cover fresh but also prolongs its life. Follow these laundry tips to maintain its quality.
Can I Use a Duvet Instead of a Comforter?
Yes, you can use a duvet instead of a comforter! Duvets offer benefits like easier washing and customization with covers, while comforters tend to be thicker and more cumbersome.
If you prefer versatility and lighter options, a duvet’s your best bet. Plus, switching out covers lets you refresh your decor easily.
Just keep in mind the differences in warmth and style to guarantee it suits your needs.
What Fabric Is Best for Quilt Covers?
Cotton or linen? Both are great choices for quilt covers, but they offer different benefits.
Cotton’s soft and breathable, making it perfect for year-round use. On the other hand, linen’s textured and durable, providing a chic, relaxed vibe.
When you’re considering fabric types, think about care tips too. Cotton’s easy to wash, while linen may require gentle handling.
How Do I Store My Quilt Cover When Not in Use?
When you’re not using your quilt cover, store it in a cool, dry place to prevent moisture damage.
Use a breathable cotton storage bag or a linen closet, ensuring it’s clean and completely dry.
For seasonal rotation, keep your quilt covers organized by season, labeling them if needed.
This way, you’ll easily find your favorite covers when it’s time to switch them out, keeping everything fresh and ready for the next use!
Are There Specific Sizes for Quilt Covers?
Yes, there are specific quilt cover sizes that align with standard dimensions. Typically, you’ll find sizes like twin, full, queen, and king.
A twin quilt cover usually measures around 68 by 86 inches, while a queen is about 90 by 90 inches. If you’re using a king-sized bed, look for covers that measure around 106 by 92 inches.
Always check the dimensions to guarantee a perfect fit for your quilt!
Conclusion
Now that you’ve successfully dressed your comforter in its new quilt cover, it’s like wrapping a gift for your bed! You can kick back and enjoy the cozy warmth and fresh look it brings to your space.
Remember, a little practice makes perfect. So don’t hesitate to repeat these steps whenever you want a change.
With your stylish comforter ready and your quilt cover perfectly in place, you’re all set to snuggle in and drift away into dreamland!