7 Simple Steps to Fold a Quilt Neatly
If you’ve ever found yourself frustrated by messy, bulky quilts taking up too much space or getting wrinkled in storage, you’re not alone. Many people struggle to fold a quilt neatly, and it can be tricky to keep them looking fresh and organized.
But the good news is, with a few simple steps, you can conquer the chaos and preserve your favorite quilts beautifully.
Folding your quilt neatly is essential for preservation and a tidy space.
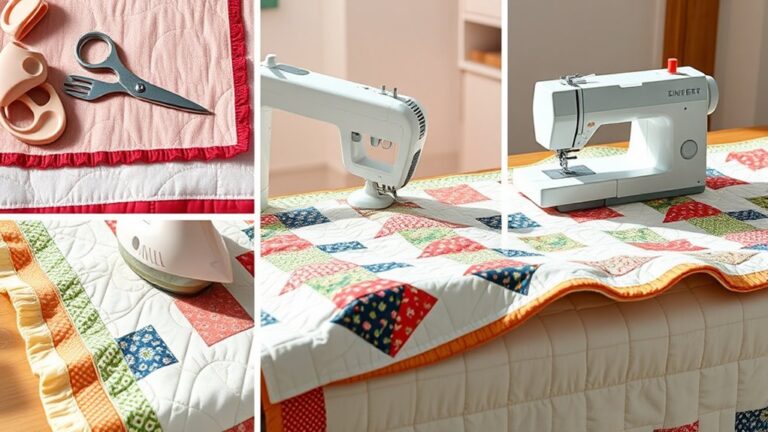
Start by laying the quilt flat on a clean surface.
Smooth out any wrinkles using a steamer or low iron.
Fold it in half lengthwise, then again widthwise for a compact shape.
Tuck in loose corners for a neat finish.
Store it in a breathable bag or fabric container to protect it from dust and moisture.
There’s more to learn about folding techniques and storage options ahead.
Key Takeaways
- Start by laying the quilt flat on a clean, clutter-free surface to ensure smooth folding.
- Smooth out any wrinkles using a steamer or iron. Just be sure to follow the fabric care instructions for your quilt.
- Fold the quilt in half lengthwise, aligning the edges carefully. As you do this, smooth the fabric to remove any air pockets.
- Fold the quilt in half again for a more manageable size. Make sure the corners are aligned neatly as you go.
- Lastly, consider folding it into a smaller rectangle for storage. This helps maintain a compact shape, making it easy to handle.
Why Folding Your Quilt Is Crucial
When you fold your quilt neatly, not only do you protect its fabric and stitching, but you also improve your living space’s overall appearance.
Proper quilt maintenance is important to guarantee your favorite piece lasts for years. A well-folded quilt minimizes creasing and prevents damage, preserving its beauty and functionality.
Using effective storage solutions is significant, too. By folding your quilt correctly, you can easily store it in a closet or on a shelf without taking up too much space. This organized approach keeps your home tidy and makes it simple to access your quilt whenever you need it.
Moreover, a folded quilt can double as a decorative element, adding warmth and style to your room.
Gather Your Space and Tools for Folding
To fold your quilt neatly, you first need to prepare your space and gather the right tools.
Find a flat, clean surface where you can work comfortably. This could be a large table or even the floor.
Make certain the area is free from clutter to avoid distractions and guarantee efficiency.
Ensure your workspace is clutter-free to minimize distractions and enhance your folding efficiency.
That way, you’ll have plenty of room to work.
Next, gather your tools. You’ll need a measuring tape or ruler to help with precise folding, especially if you’re using specific folding techniques.
Consider having some storage solutions nearby, like bins or shelves, to neatly store your folded quilt once you’re done.
Having everything in place will make the process smoother and help you achieve a tidy finish.
With the right setup, you’ll find that folding your quilt becomes a straightforward task, allowing you to focus on perfecting your technique.
Step 1: Lay the Quilt Flat
To get started, just find a nice, clean, flat surface where you can lay your quilt out. Go ahead and spread it out fully, taking a moment to smooth away any wrinkles you see. Doing this makes everything easier and really helps you get a neat, tidy fold later on. It’s a simple step, but it sets you up for a great finish!
Choose a Clean Surface
Choosing a clean surface is essential for laying your quilt flat. Look for a space like a large table, bed, or floor that’s free from clutter and dirt.
A clean surface guarantees your quilt stays pristine and avoids any unwanted marks. Proper lighting is also key; it helps you see the quilt’s details and makes the folding process easier.
Natural light is ideal, but if that’s not available, use bright, white bulbs to illuminate your workspace.
By setting up a clean and well-lit area, you create a perfect environment for your quilt folding project.
This simple step makes a big difference in achieving a neat and tidy fold without any distractions or messes.
Smooth Out Wrinkles
As you prepare to fold your quilt, smoothing out any wrinkles is essential for achieving a neat finish.
Start by laying the quilt flat on your clean surface, ensuring it’s fully spread out.
Gently tug at the edges to pull out any creases.
If you notice stubborn wrinkles, consider using your hands to press them down or lightly steaming them for effective wrinkle removal.
Always remember to handle the fabric with care to avoid damage.
If you opt for an iron, use a low setting to protect the fabric’s integrity.
Once the quilt is smooth, you’re ready to move on to the next step in your folding process.
This ensures your quilt looks its best.
Step 2: Smooth Out Wrinkles
Smoothing out wrinkles is essential for achieving a tidy quilt fold.
Start by gently laying your quilt on a flat surface. If the fabric looks crinkled, grab a handheld steamer or an iron on a low setting.
Make sure to check the fabric care instructions first to avoid any damage.
As you glide the steamer or iron over the quilt, focus on any stubborn areas where wrinkles linger.
If you’re using a steamer, keep it a few inches away from the fabric to prevent water spots.
For the iron, use a pressing cloth to protect delicate fabrics.
Once you’ve completed the wrinkle removal, take a moment to admire your work.
A smooth quilt not only looks better but also folds more easily.
With the wrinkles out of the way, you’re ready to proceed to the next step in your folding process.
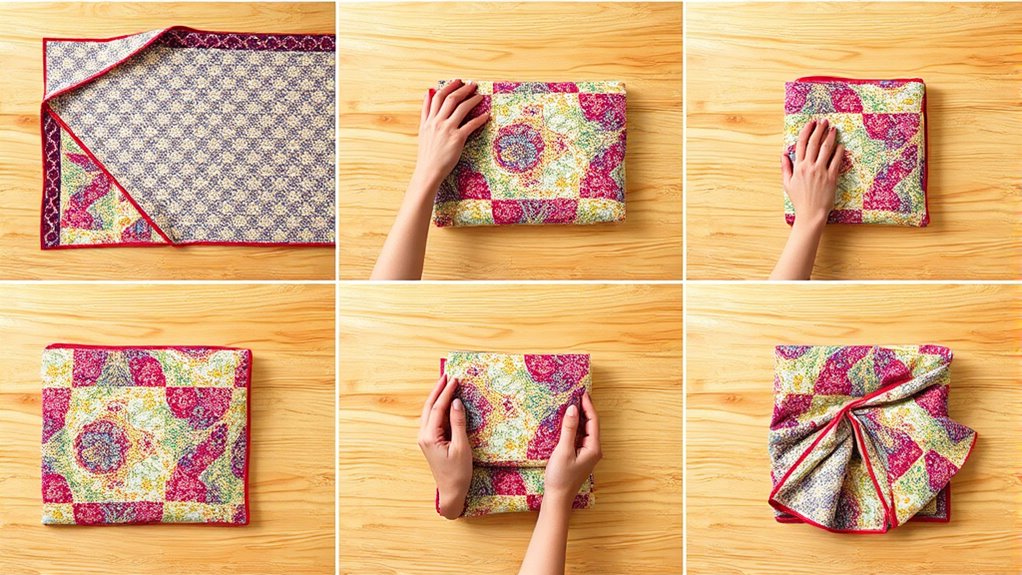
Step 3: Fold in Half Lengthwise
Now that you’ve taken care of those wrinkles, let’s move on to the next step. Go ahead and fold your quilt in half lengthwise. As you do this, try to line up the edges as neatly as you can. This way, you’ll end up with a nice, clean fold that keeps your quilt looking tidy—perfect for storing it away or showing it off.
Align Edges Carefully
To achieve a neat fold, align the edges of your quilt carefully. Start by laying the quilt flat, ensuring it’s fully spread out.
Next, take one side and bring it toward the opposite edge, focusing on aligning corners perfectly. This step is essential for precision folding, as it sets the foundation for the rest of the process.
Make sure the edges are even; any misalignment can lead to an uneven fold later on. If needed, adjust the corners gently until they match.
Once everything’s aligned, press down lightly to create a crease along the fold. This attention to detail will help you maintain a tidy appearance and make future storage hassle-free.
Smooth Out Wrinkles
After aligning the edges, it’s important to smooth out any wrinkles before you fold the quilt in half lengthwise. Start by gently running your hands over the fabric, working from the center outwards.
This helps with wrinkle prevention and guarantees a neat fold. If you spot any stubborn creases, consider using a fabric-safe steamer or a light iron on a low setting, but make sure to follow the quilt’s fabric care instructions.
Always test a small area first to avoid damage. Once the surface is smooth, you’re ready to proceed with the fold.
Taking this extra step not only improves the quilt’s appearance but also contributes to its longevity, keeping it looking beautiful for years to come.
Ensure Even Fold
Folding the quilt in half lengthwise is essential for achieving an even fold. Start by laying the quilt flat, ensuring it’s smooth and free of wrinkles.
Grasp the two shorter edges and bring them together, aligning them carefully. As you fold, keep an eye on those uniform edges; they’re vital for a tidy finish.
Press down gently along the fold to create an even crease. This step not only helps in organizing the quilt but also prevents it from looking bulky.
Once you’ve secured the fold, take a moment to adjust any uneven areas. A well-folded quilt not only looks appealing but also makes storage easier, ensuring your efforts in crafting it are appreciated.
Step 4: Fold in Half Again Widthwise
Next, you’ll fold the quilt in half again widthwise to create a more compact shape.
This step is essential for keeping your quilt neat and tidy.
Different fabric types may affect how your quilt folds,
so make sure you’re using effective folding techniques for best results.
Here’s a quick reference table to help you visualize the process:
| Folding Technique | Description |
|---|---|
| Basic Fold | Simple half-fold for compactness |
| Accordion Fold | Adds texture and volume |
| Roll Fold | Great for storage |
| Diagonal Fold | Ideal for displaying quilts |
Step 5: Finalize the Fold for Tidy Storage
To achieve a tidy storage solution, you’ll want to finalize the fold of your quilt with care. Start by laying the quilt flat on a clean surface. Smooth out any wrinkles, ensuring it looks neat.
Next, fold the quilt into thirds lengthwise, aligning the edges for a uniform finish. This method not only keeps the quilt compact but also makes it easier to handle.
For the final touches, you might consider folding the quilt again into a smaller rectangle, depending on your storage options. If you’re using a box or a shelf, a smaller fold will fit better.
Don’t forget to tuck any loose corners neatly inside.
Once folded, place your quilt in a breathable storage bag or a fabric container to protect it from dust and moisture. This way, your quilt stays in pristine condition, ready for use whenever you need it!
Frequently Asked Questions
How Often Should I Fold My Quilt?
You should fold your quilt every time you put it away. This helps maintain its shape and prevents creasing.
For quilt maintenance, aim to fold it neatly at least once a week, especially if you use it regularly.
When storing, use breathable fabric bags to avoid moisture buildup. This way, you keep it in great condition and ready for use whenever you need it.
Can I Store My Quilt in a Bag?
Absolutely, you can store your quilt in a bag! Think of it as tucking your quilt into a cozy nest.
For quilt storage, choose breathable fabric bags or vacuum-sealed options. Fabric bags allow airflow, keeping your quilt fresh, while vacuum-sealed bags protect against moisture and pests.
Just remember to fold it neatly first, ensuring it stays in tip-top shape until you bring it out again to wrap yourself in that warmth.
What Fabric Types Require Special Folding Techniques?
Certain fabric types, like silk, require special folding techniques due to their sensitivity. You’ll want to lay silk quilts flat to avoid creasing and damage.
Cotton care is simpler. You can fold cotton quilts without much worry, but avoid sharp folds that could leave marks.
Always make sure your quilts are clean and dry before storing them. This helps maintain their quality.
Proper folding preserves the fabric and keeps your quilts looking great.
How Do I Prevent Creases When Storing?
To prevent creases when storing your quilt, always fold it loosely instead of tightly.
Use a breathable cotton storage bag to allow airflow, which helps reduce moisture.
Avoid stacking heavy items on top, as this can create unwanted pressure.
If you’re using a storage box, choose one that’s large enough to let your quilt lie flat.
Regularly check on your quilt to keep it in good condition and maintain its beauty.
Is It Okay to Hang My Quilt Instead?
Absolutely, you can hang your quilt! It’s like displaying a piece of art that tells a story.
For quilt display options, consider using sturdy hanging methods like clips or curtain rods to avoid damage.
Just make sure your quilt’s fabric can handle being hung without stretching or fading. This way, you not only keep it safe but also turn your quilt into a beautiful focal point in your space.
Enjoy showcasing it!
Conclusion
You’ve mastered the art of folding a quilt, a skill so critical it could rival world peace.
Who knew that neatly storing a quilt could be the key to a harmonious life?
Forget global warming and economic crises; your neatly folded quilt is the real triumph of modern civilization.
So go ahead, bask in the glory of your quilt-folding prowess.
And remember: if you can’t solve the world’s problems, at least you can tackle your linen closet with the perfect quilt folding technique!