10 Steps to Clean Old Quilts Safely
If you’ve ever pulled a cherished old quilt from storage only to find it stained, faded, or a bit musty, you’re not alone. Many people struggle with how to clean old quilts safely, worrying that one wrong move could cause irreversible damage.
To clean your old quilts safely, start by evaluating for stains and damage. Gather natural detergents and eco-friendly supplies.
Choose the right method based on the fabric type. Hand washing is gentle, while machine washing on a delicate cycle works for sturdy fabrics.
Always air dry to protect against shrinkage and fading. For stubborn stains, spot clean with mild solutions.
Storing them properly also helps maintain their condition. Uncover more tips for preserving your quilt’s beauty.
Key Takeaways
- Inspect quilts for stains, discoloration, and damage before cleaning to determine the appropriate cleaning method.
- Use eco-friendly detergents and tools like soft brushes for gentle cleaning, depending on the fabric type.
- Hand wash delicate fabrics in lukewarm water. For sturdier fabrics, you can use a machine wash on a delicate cycle.
- Air dry quilts flat or hang them in a shaded, ventilated area. This helps maintain their shape and prevents fading.
- Store quilts in breathable materials, and use acid-free tissue to prevent creases and color transfer.
Why Cleaning Your Old Quilt Matters
Cleaning your old quilt matters more than you might think. Not only does it improve the quilt’s aesthetic appeal, but it also plays an essential role in quilt preservation techniques.
By keeping your quilt clean, you’re protecting it from dust, dirt, and potential mold that can degrade its fabric over time. This is especially important when considering the historical quilt significance; many quilts tell stories and hold memories that deserve to be preserved for future generations.
Keeping your quilt clean safeguards its fabric from dust, dirt, and mold, preserving the stories and memories woven into its history.
When you clean your quilt properly, you’re maintaining its integrity and ensuring it remains a cherished heirloom. A well-cared-for quilt can serve as a tangible connection to your family’s history, sparking conversations and memories.
Plus, a clean quilt provides comfort and warmth, making it even more inviting for use. So, take the time to clean your old quilt. It’s an investment in both its beauty and its legacy.
How to Spot Damage and Stains on Your Quilt?
How can you identify damage and stains on your quilt effectively? Start with a thorough visual inspection.
Look for any discoloration, faded areas, or visible stains. Pay close attention to the seams and edges, as these are often where fabric damage occurs.
Use quilt inspection techniques like holding the quilt up to light. This can reveal hidden tears or thinning fabric that might not be visible otherwise.
Next, gently run your fingers over the quilt’s surface. You might feel rough patches or irregular textures that indicate wear.
Take note of any areas that feel fragile or crunchy, as these are signs of deteriorating fabric.
Don’t forget to check for mildew or musty odors, as they often accompany stains. By being diligent in identifying fabric damage and stains, you can address issues early and preserve your quilt’s integrity for years to come.
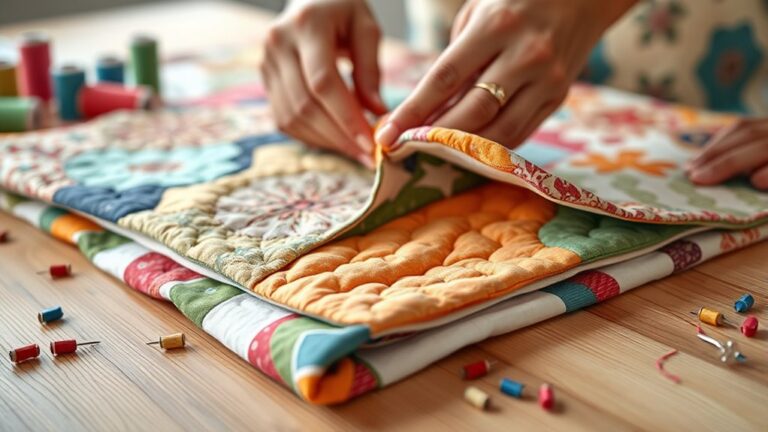
Gathering Essential Supplies for Cleaning
Before you dive into cleaning your old quilt, let’s make sure you’ve got all the right supplies on hand. It’s a good idea to gather the recommended cleaning products first, so you’re not scrambling for something mid-process. Along with that, having the right tools and equipment handy will save you a lot of hassle.
Getting everything ready ahead of time really makes the whole cleaning routine go more smoothly—and you’ll get much better results, too.
Recommended Cleaning Products
When tackling the task of cleaning old quilts, having the right supplies on hand is essential.
Opt for natural detergents and eco-friendly options that won’t harm the fabric or the environment.
Here’s a quick list of recommended cleaning products to gather:
- Gentle Liquid Soap – Look for a natural, biodegradable option.
- White Vinegar – Great for deodorizing and removing stains.
- Baking Soda – A mild abrasive that helps lift dirt and odors.
- Essential Oils – Add a few drops for a fresh scent without harsh chemicals.
These products not only help clean effectively but also preserve the integrity of your treasured quilts.
With these supplies at your side, you’re ready to start the cleaning process safely and efficiently.
Necessary Tools and Equipment
Having the right cleaning products is just the start. You’ll also need some key tools and equipment to make the process smoother.
Understanding fabric care is essential. This helps you avoid common cleaning myths that can damage your quilt.
Here’s a handy table to help you gather what you’ll need:
| Tool/Equipment | Purpose |
|---|---|
| Soft brush | Remove dust and debris |
| Basin or tub | Soak quilts safely |
| Measuring cup | Guarantee precise detergent use |
| Clean, white towels | Pat dry without causing damage |
With these tools in hand, you’ll be ready to clean effectively while preserving the beauty of your quilt.
How to Choose the Right Cleaning Method for Different Quilt Fabrics
When it comes to cleaning your old quilts, the first thing you’ll want to do is figure out what kind of fabric you’re dealing with. Not all quilt fabrics are created equal, and each one has its own needs when it comes to stain removal and cleaning. Some materials can handle a gentle wash, while others might only be safe if you take them to a professional for dry cleaning.
Fabric Type Considerations
Choosing the right cleaning method for your quilt largely depends on the fabric type.
Understanding fabric durability and performing colorfast testing can help you make the best choice.
Here’s a quick guide:
- Cotton: Generally durable. You can machine wash it with cold water.
- Silk: This fabric is delicate, so hand wash gently using a mild detergent and cold water.
- Wool: Wool requires careful handling. Consider dry cleaning or using a wool-specific cleaner.
- Synthetic: These fabrics are often durable. Machine wash is usually fine, but check for special care instructions.
Always test a small, inconspicuous area first to make sure the colors won’t bleed.
Stain Treatment Methods
Stains on your quilt can be intimidating, but the right treatment method can make all the difference.
Start by identifying the fabric type.
For delicate fabrics like silk or vintage cotton, opt for gentle stain removers or a mild soap solution.
Always test any cleaner on a hidden area first to guarantee it won’t damage the fabric.
For sturdier materials, like polyester blends, you can use a stronger solution.
Remember to dab, don’t rub, to avoid spreading the stain.
Regular stain prevention, such as storing your quilt in a cool, dry place, can help maintain its beauty.
With proper fabric care and timely intervention, you can keep your quilt looking fresh and vibrant for years to come.
Washing vs. Dry Cleaning
While you might feel unsure about how to clean your quilt, knowing whether to wash or dry clean it can really make things easier. The best method depends on both the type of fabric and its overall condition.
Here are some practical tips to help you decide:
- Cotton Quilts: Stick with gentle washing techniques, such as using cold water and a mild detergent. This helps keep the fabric in good shape over time.
- Silk or Delicate Fabrics: In these cases, it’s better to opt for dry cleaning. That way, you reduce the risk of causing any damage to the material.
- Wool Quilts: For wool, hand washing with care is key. This approach helps maintain the quilt’s shape and texture.
- Vintage Quilts: Before doing anything, test a small, hidden area first. For extra peace of mind, you might want to go with professional cleaning to help preserve the quilt’s integrity.
Preparing Your Quilt for a Safe Wash
Before you plunge into washing your old quilt, it’s essential to prepare it properly to avoid any damage.
Start by following some quilt inspection tips: check for loose threads, stains, or any signs of wear. Gently examine the seams and fabric for any weaknesses.
If you spot any issues, consider mending them before washing.
Next, think about fabric preservation techniques. If your quilt features delicate fabrics, note their specific care requirements.
You might want to test a small, inconspicuous area with water to see how the fabric reacts.
Finally, make sure to remove any embellishments like buttons or beads that could snag or damage the quilt during washing.
Once you’ve completed these steps, you can confidently move on to the washing process, ensuring your quilt stays in great condition for years to come.
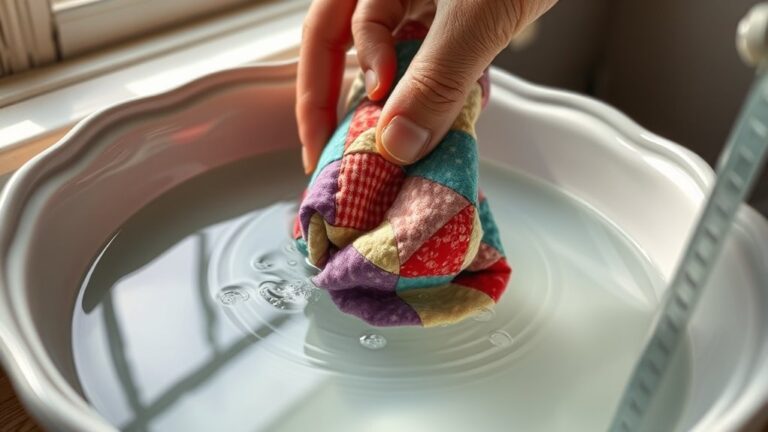
Hand Washing vs. Machine Washing Your Quilt
In regard to cleaning your quilt, you might wonder whether hand washing or machine washing is the better option.
Both methods have their pros and cons, but it often depends on your quilt’s condition and fabric.
Here’s a quick comparison:
1. Hand Washing: You’ll gently submerge your quilt in a tub, using lukewarm water and mild detergent.
This method minimizes wear and tear.
2. Machine Washing: You can toss it in a front-loading washer on a delicate cycle.
Just make sure to use a large enough machine to prevent crumpling.
3. Detailing: Hand washing allows for more attention to stains, while machine washing saves time.
4. Drying: Hand washed quilts can be laid flat to dry.
Machine washed ones should be air-dried to avoid shrinkage.
Choosing between hand washing and machine washing really hinges on how delicate your quilt is and how much time you have.
Safe Methods for Drying Your Quilt
Once you’ve finished cleaning your quilt, it’s really important to dry it the right way so it stays in great condition. Instead of tossing it in the dryer, try using air drying methods. This helps protect the fabric and keeps your quilt looking its best.
You’ll want to keep it out of direct sunlight, though, since too much sun can cause the colors to fade. Just find a clean, flat surface—like a large table or even the floor—and lay your quilt out gently. That way, it holds its shape and doesn’t get stretched or distorted as it dries.
Air Drying Techniques
Air drying your quilt is one of the safest methods to preserve its delicate fabrics and colors.
By choosing this technique, you’ll enjoy several air drying benefits while ensuring proper quilt care.
Here are some effective air drying techniques:
1. Lay Flat: Spread your quilt on a clean, dry surface, like a large table or a clean floor,
to maintain its shape.
2. Use a Clothesline: Hang it outdoors or in a well-ventilated area, securing it with clothespins
to avoid sagging.
3. Shade Drying: If possible, place it in a shaded area to prevent color fading
without direct sunlight.
4. Rotate: Flip the quilt periodically to promote even drying and prevent damp spots.
These methods help maintain your quilt’s integrity while allowing it to dry naturally.
Avoid Direct Sunlight
Direct sunlight can be harsh on your quilt. Over time, it causes colors to fade and fabrics to weaken.
To protect your quilt while drying, consider these UV protection tips:
| Drying Method | Pros | Cons |
|---|---|---|
| Shade drying | Prevents fading fabrics | Slower drying time |
| Indoor drying | Controlled environment | Limited space |
| Use a UV cover | Blocks harmful rays | Requires setup |
| Hang in a breezy area | Good air circulation | Risk of tangling |
| Use a drying rack | Keeps quilt flat | Needs space |
Use Flat Surfaces
Using flat surfaces is one of the safest methods for drying your quilt.
This technique helps preserve the fabric and shape, maximizing the flat surface benefits.
Here are some effective cleaning techniques to keep in mind:
1. Use a clean table:
Lay your quilt flat on a clean, dry table to avoid any dirt or residue.
2. Employ a large towel:
Spread a large, absorbent towel underneath to catch excess moisture.
3. Rotate regularly:
Turn the quilt every few hours to guarantee even drying and prevent any creasing.
4. Avoid weight:
Don’t place heavy items on the quilt; this helps maintain its shape and prevents distortion.
Effective Spot Cleaning Techniques for Stubborn Stains
While old quilts can hold cherished memories, stubborn stains can detract from their beauty and history. To tackle these blemishes effectively, start with spot cleaning techniques tailored to the fabric type.
First, test any cleaner on a hidden area to verify it won’t damage the quilt. For most stains, gently dab a mixture of mild detergent and water onto the affected area using a soft cloth.
Avoid rubbing, as this can spread the stain or damage the fabric. If the stain persists, consider using a mixture of white vinegar and water or a specialized stain remover suitable for your quilt’s material.
Always blot rather than scrub, applying light pressure. After treating the stain, rinse the area with a damp cloth to remove any residue.
Proper Storage Tips for Your Clean Quilt
Storing your clean quilt properly guarantees it stays fresh and intact for years to come.
To guarantee ideal quilt storage, consider these essential tips:
1. Use Breathable Materials:
Choose cotton or muslin bags instead of plastic. This helps prevent moisture buildup and allows your quilt to breathe.
2. Maintain Climate Control:
Store your quilt in a cool, dry place with stable temperatures. This will help protect it from mold and mildew.
3. Avoid Folding Creases:
Rolling your quilt is better than folding. It helps prevent permanent creases and reduces fabric stress.
4. Use Acid-Free Tissue:
Try placing acid-free tissue paper between layers. This can help avoid color transfer and fabric damage.
Keeping Your Quilt in Great Shape Between Washes
Proper storage keeps your quilt safe, but maintaining its shape and vibrancy between washes is just as vital.
To guarantee ideal quilt care, follow these maintenance tips.
Ensure your quilt stays in top condition by following these essential maintenance tips for care and longevity.
First, avoid placing heavy items on your quilt; this can cause creasing and distort its shape.
Instead, lay it flat when possible or use a padded hanger for display.
Regularly air out your quilt by hanging it outside on a dry, breezy day.
This helps eliminate odors and keeps it fresh.
If you notice any dust or lint, use a soft brush or lint roller to gently remove it.
For minor stains, spot clean immediately with a mild detergent and a damp cloth.
Finally, always handle your quilt with clean hands to prevent transferring oils or dirt.
Frequently Asked Questions
Can I Use Bleach on My Old Quilt?
You shouldn’t use bleach on your old quilt, as it can damage the fabric and colors.
Instead, consider bleach alternatives like vinegar or hydrogen peroxide for gentle stain removal.
Always test any cleaner on a small, hidden area first to verify it won’t harm the quilt.
When caring for delicate fabrics, stick to mild detergents and cold water to preserve your quilt’s integrity and beauty for years to come.
How Often Should I Clean My Quilt?
You should clean your quilt every 3 to 6 months, depending on how often you use it.
Regular maintenance is key for longevity, so follow these quilt maintenance tips: spot clean stains immediately, and wash it gently in cold water when needed.
Always check the fabric care label for specific instructions to prevent damage.
With proper care, your quilt will stay beautiful and last for years to come!
What Should I Do if My Quilt Shrinks?
If your quilt shrinks, don’t panic! First, check the fabric care instructions to understand its limits.
You can try gently stretching it back into shape while it’s still damp. This often helps restore some of its original size.
For future quilt care, wash it in cold water and avoid high heat during drying. This will help with fabric preservation.
Always handle your quilt with care to maintain its beauty and integrity for years to come.
Are There Professional Cleaning Services for Quilts?
Yes, there are professional cleaning services specifically for quilts. These experts understand quilt preservation and can handle various fabric types delicately.
They’ll assess your quilt’s condition, recommend the best cleaning method, and guarantee it retains its beauty and integrity. By choosing a professional service, you avoid potential damage from improper washing techniques.
It’s a smart choice for maintaining your quilt’s value and longevity while preserving its unique history.
How Can I Repair Small Tears in My Quilt?
You can repair small tears in your quilt using simple patch techniques. First, choose a fabric that closely matches your quilt’s pattern or color.
Cut a patch slightly larger than the tear, then pin it in place. Hand-stitch or machine-sew around the edges, securing it firmly.
If you’re feeling creative, consider using decorative stitches for added flair. Just make sure the fabric is durable enough to withstand wear and tear.
Conclusion
By giving your old quilt the care it deserves, you’re not just preserving fabric; you’re safeguarding memories stitched into every thread.
Like a timeworn tree that stands tall through seasons, your quilt can continue to tell stories of warmth and comfort.
With the right cleaning methods and storage practices, you’ll guarantee its vibrant colors and intricate patterns shine for generations to come.
Welcome the legacy woven into your quilt, and let it wrap you in its history. And remember, learning how to clean old quilts safely is the best way to keep your treasures beautiful and lasting for years.