Beginners Guide to Binding a Quilt Step by Step
If you’ve ever reached the final stage of your quilting project only to feel overwhelmed by the binding process, you’re not alone. Many beginners and even experienced quilters struggle to get quilt binding just right.
It’s easy to worry about puckered edges, mismatched fabrics, or messy corners—after all, you’ve invested hours into your quilt and want that perfect, finished look. But don’t worry. Many people face the same challenges when it comes to binding a quilt, and finding clear, step-by-step solutions can make all the difference.
Binding a quilt is a key step that improves both durability and aesthetics. Start by choosing fabrics that complement your quilt’s design.
Prepare the edges by trimming and pressing seams for a polished look.
Cut your binding strips and attach them with care, ensuring neat corners.
If you run into issues like puckering, adjust your sewing tension.
For unique flair, investigate creative binding techniques.
Keep going to uncover more tips for perfecting your quilt binding!
Key Takeaways
- Choose fabric that complements your quilt and is smooth for easier handling and a polished look.
- Trim quilt edges for a clean finish and prepare binding strips cut to 2.5 inches width.
- Secure binding strips along the quilt edge with clips or pins so you get more accuracy while sewing.
- You can try hand binding for a durable finish, or go with machine binding if you want efficiency, especially for larger projects.
- If you run into common issues like puckering, try adjusting your tension and use a walking foot while sewing to help things go smoothly.
Choosing the Right Fabric for Your Quilt Binding
Choosing the right fabric for your quilt binding can make all the difference in your finished project. Start by considering your fabric color choices; they should complement your quilt while enhancing its overall theme.
Think about fabric texture considerations, as smoother bindings are easier to work with and provide a polished look. When selecting binding fabric types, confirm they coordinate with the quilt’s print patterns without overwhelming them.
Fabric weight factors also play an essential role. Heavier fabrics might not fold neatly, so keep that in mind.
Seasonal fabric selections can add a unique touch, but remember to pre-wash fabrics to prevent shrinkage issues later. You might want to investigate contrasting fabric options to create a striking visual effect.
Ultimately, matching quilt themes will guide your decisions, guaranteeing your binding not only looks great but feels cohesive with the entire quilt.
Getting Your Quilt Edges Ready for Binding
Once you’ve selected the perfect fabric for your quilt binding, it’s time to prepare your quilt edges for that finishing touch.
Proper quilt preparation guarantees your edges are ready for binding and provides edge stabilization.
Start by checking your seam allowance. It should be consistent throughout your quilt. This helps maintain the integrity of your layers.
Here’s a quick reference table for your edge preparation:
| Step | Action | Tools Needed |
|---|---|---|
| 1. Trim Edges | Cut excess fabric for a clean edge | Rotary cutter, ruler |
| 2. Press Seams | Iron seams flat for a smooth finish | Iron |
| 3. Stabilize Edges | Use fabric tape or pins to secure edges | Fabric tape, pins |
| 4. Check Alignment | Verify edges are even before binding | Measuring tape |
Following these steps will set you up for a successful binding process!
Making Your Own Binding Strips: A Step-by-Step Guide
Creating your own binding strips is a rewarding step
that adds a personal touch to your quilt. Here’s how to do it:
– Choose your binding fabric types:
Use cotton for durability, or try bias tape if you want more flexibility.
– Determine binding strip lengths:
Measure your quilt’s perimeter and cut strips to fit.
A width of 2.5 inches is typical for most projects.
– Cut the strips:
Grab a rotary cutter and mat to get straight edges.
Cutting against the grain gives you the best results.
– Join the strips:
Sew the strips together at a 45-degree angle.
This helps minimize bulk and gives you a seamless finish.
– Press the strips:
Fold and press them in half lengthwise, wrong sides together.
That way, you’ll have a crisp, clean edge to work with.
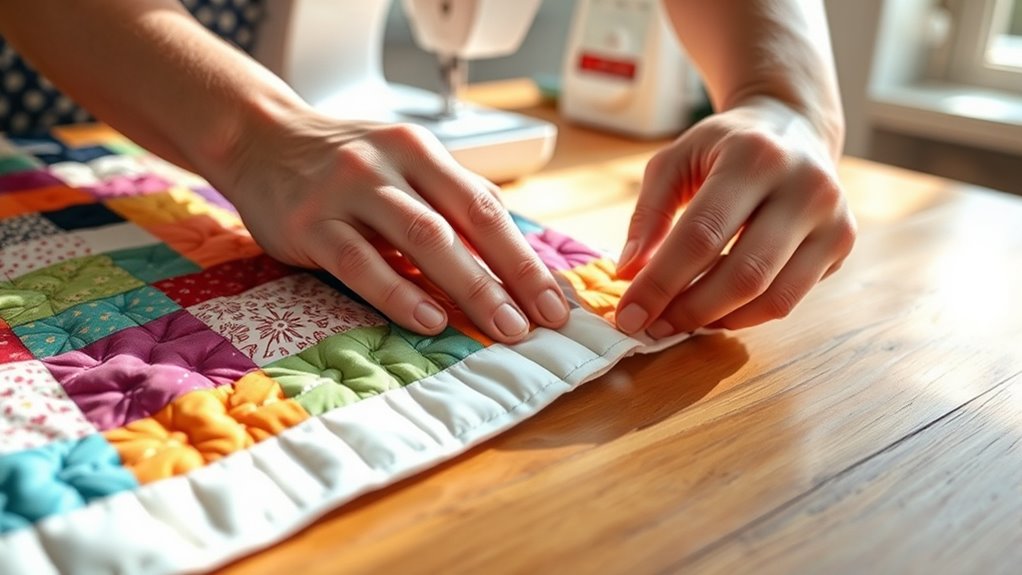
Attaching the Binding to Your Quilt: First Steps
Now that you’ve got your binding strips ready, it’s time to start attaching them to your quilt. First things first—make sure the edges of your quilt are prepped and nice and straight. Once that’s done, grab your binding strips and line them up carefully along the edge.
This part is important because it sets you up for a smooth, polished finish later. So, take your time with the alignment, and when you’re ready, let’s move on to the next step!
Preparing Your Binding Strips
Before you plunge into attaching the binding to your quilt, preparing your binding strips is essential for a polished finish.
Start by selecting the right binding fabric types, such as cotton or cotton blends, that match your quilt’s aesthetic.
Then, use effective cutting techniques to guarantee uniformity and ease of application.
Here’s what you should do:
- Measure your quilt’s perimeter to determine the length of binding needed.
- Cut your strips at 2.5 inches wide for a standard finish.
- Join the strips at a 45-degree angle for a seamless look.
- Press the strips in half, wrong sides together, for a clean edge.
- Prepare extra strips for corners and curves, ensuring flexibility.
These steps will set you up for success!
Attaching To Quilt Edge
With your binding strips prepared, it’s time to attach them to your quilt edge. Start by aligning the binding with the quilt’s edge, using proper quilt measurements for accuracy.
Secure it with binding tools like clips or pins. Choose fabric that complements your quilt’s colors for effective color coordination.
| Binding Style | Sewing Technique |
|---|---|
| Single-fold | Straight stitch |
| Double-fold | Zigzag stitch |
| Bias binding | French seam |
Make certain your edge preparation is neat to guarantee a polished finish. As you sew, pay attention to your stitching; this will improve the overall quilt finishes and make your project shine!
How to Fold and Sew Binding Corners
Folding and sewing binding corners can seem tricky, but mastering this technique really improves your quilt’s finish.
Properly executed corners not only prevent binding errors, but they also boost your quilt’s overall aesthetics.
Well-executed corners enhance both the functionality and visual appeal of your quilt, ensuring a beautifully finished project.
Here are some corner tips to help you:
- Choose the right fabric options: Use fabric that complements your quilt.
- Practice creative folds: Try out different folding techniques for a more polished look.
- Use consistent sewing methods: Make sure you’re sewing the binding at the same width all the way around.
- Pin or clip corners: This helps keep your binding in place while you sew.
- Finish with care: Pay close attention to those last stitches so your edges come out seamless.
Finishing Your Binding: Hand or Machine?
When you get to the final step of your quilt—the binding—you might find yourself debating: should I finish by hand, or go with the machine? Hand binding gives your quilt that classic, timeless look, and there’s something really satisfying about those tiny, almost-invisible stitches. On the other hand, machine binding is a huge time saver and makes for an extra-durable edge, which is great if your quilt will get a lot of use or frequent washing.
Hand Binding Benefits
Hand binding a quilt offers unique benefits that can improve your finished piece.
Choosing this method not only adds a personal touch, but also guarantees lasting quality.
Here are some advantages of hand binding:
- Improved Quilt Durability: Hand stitching creates a strong bond that withstands wear and tear.
- Precision: You can control the tightness and placement of each stitch for a polished look.
- Customization: Choose thread colors and styles that suit your design.
- Relaxing Process: Hand binding allows you to slow down and enjoy the craft.
- Connection to Tradition: It honors the age-old techniques of quilt making.
Machine Binding Advantages
While hand binding has its charm, machine binding offers a quick and efficient alternative that many quilters appreciate. With the right binding techniques, you can complete your quilt in markedly less time.
Machine efficiency allows you to tackle larger projects without the fatigue that hand stitching can cause. Plus, you’ll find that most fabrics have great compatibility with machine binding, making it versatile for any quilt.
The speed advantages are undeniable, especially when you utilize various stitch options to suit your style. While some may have durability concerns, using quality quilting tools can guarantee a strong finish.
Tips for Achieving Even Binding Width
Achieving an even binding width is essential for a polished quilt finish. To guarantee your binding looks great, follow these tips:
- Use quality binding tools: Invest in a rotary cutter and a clear ruler for precise cuts.
- Measure carefully: Consistently use measuring techniques to cut your strips.
A 2.5-inch width is standard for most quilts.
– Press as you go: Iron your binding strips to keep them flat.
This makes them easier to sew evenly.
- Pin or clip: Secure your binding to the quilt with pins or clips so it won’t shift as you sew.
- Sew slowly: Take your time when stitching the binding.
Moving slowly helps you maintain an even width and reduces mistakes.
Addressing Common Binding Issues Early
Even the best-prepared binding can encounter issues during the sewing process. To tackle binding mistakes, start by ensuring fabric compatibility.
Pre-washing fabrics helps avoid shrinkage later on. Measurement accuracy is essential; double-check your dimensions before cutting.
If you notice puckering, it might be due to improper sewing tension. Adjust your machine settings and test on a scrap piece first.
Pressing techniques can also make a difference. Always press your seams flat to avoid bulk.
When using quilting tools, like a walking foot, you can minimize fabric shifting. If you’re facing uneven edges, consider using binding variations that better suit your quilt’s design.
Finally, don’t hesitate to use troubleshooting tips. If something doesn’t look right, pause and assess the situation.
Early intervention can save you time and frustration, allowing you to enjoy the binding process.
Unique Techniques for Creative Quilt Binding
When it comes to quilt binding, trying out some unique techniques can truly take your project to the next level. For example, have you ever considered using bias binding? It’s a flexible option that wraps neatly around curves and corners, making your quilt edges look smooth and professional.
You could also play around with decorative stitch techniques. Adding a few eye-catching stitches along the binding isn’t just fun—it’s a simple way to give your quilt some extra personality. These creative touches not only enhance the overall look, but they also let your individual style shine through. So, don’t be afraid to experiment and make your quilt binding as special as the rest of your project!
Bias Binding Methods
Binding your quilt with bias techniques opens up a world of creativity and personalization. These bias binding methods not only improve your quilt’s appearance, but also offer practical benefits.
Here are some key bias binding advantages:
- Flexibility: Bias binding curves around corners easily.
- Durability: It withstands wear and tear better than straight binding.
- Variety: You can choose from an array of fabrics for unique looks.
- Neat Edges: Achieve a professional finish that boosts your quilt.
- Custom Fit: It conforms to irregular shapes seamlessly.
With these bias binding techniques, you’ll create a stunning quilt that truly showcases your personality and craftsmanship. So, gather your materials and let your creativity shine!
Decorative Stitch Techniques
There’s something exciting about adding decorative stitches to your quilt binding. These unique techniques can raise your quilt from simple to stunning, making it truly one-of-a-kind.
Start by choosing a stitch that complements your quilt’s design. Zigzag, scallops, or even hearts can add a fun touch.
Use contrasting thread colors to make your decorative stitches pop, or coordinate with your fabric for a more subtle look.
Experiment with different stitch lengths and widths to create varied textures. This is a great way to add dimension to your project.
Don’t forget to take into account the placement. Stitching along the edge or within the binding can improve your quilt embellishments beautifully.
How to Care for Your Finished Quilt and Binding?
Caring for your finished quilt and its binding guarantees it stays beautiful and functional for years to come.
Follow these quilt maintenance tips to keep your quilt in top shape:
- Wash gently: Use cold water and a mild detergent to prevent fading.
- Avoid bleach: It can weaken fabric fibers and alter colors.
- Air dry: Hang your quilt to dry, or use a low-heat setting in the dryer to reduce wear.
- Store properly: Keep your quilt in a cool, dry place.
Try to keep it away from direct sunlight to avoid discoloration.
– Repair promptly: If you notice any damage, fix it right away.
This helps prevent further issues down the line.
Frequently Asked Questions
What Tools Do I Need for Binding a Quilt?
To bind a quilt, you’ll need a rotary cutter, cutting mat, and ruler for precise fabric choices.
A sewing machine makes the process quicker, while pins or clips help secure the binding as you sew.
Choose a binding technique that suits your style, like straight or bias binding.
Don’t forget an iron and thread to finish everything neatly.
With these tools, you’re all set to create a beautiful quilt edge!
Can I Use Pre-Made Binding Instead of Making My Own?
Absolutely, you can use pre-made binding instead of making your own! Think of it as a shortcut on a long road trip. It gets you there faster.
Pre-made options are convenient and come in various colors and patterns. This lets you skip the hassle of cutting and sewing.
You can still apply various binding techniques to attach it, ensuring your quilt looks polished without the extra effort.
Just choose a style that complements your project!
How Much Binding Fabric Should I Buy?
You’ll need about ½ yard of binding fabric for every 10 feet of quilt perimeter.
To calculate, measure your quilt’s sides, add them up, and divide by 10.
Keep in mind fabric width considerations.
Standard widths like 42-44 inches work best.
If you’re using wider fabric, you might need less yardage.
Always buy a little extra just in case.
It’s better to have too much than not enough!
What Is the Best Thread Type for Quilt Binding?
In regards to quilt binding, choosing the right thread is essential. It’s like selecting the perfect icing for the most decadent cake!
Opt for a 40 to 50 weight thread, typically made from cotton or polyester for durability.
A cotton thread offers a classic look, while polyester provides strength.
Match the thread color to your quilt for a seamless finish. Also, consider a matte or satin finish depending on your desired aesthetic.
How Do I Fix Binding That Doesn’T Lay Flat?
To fix binding that doesn’t lay flat, start by checking your binding techniques.
Common mistakes include cutting the fabric too narrow or not pressing seams properly.
You can gently pull the binding to ease it out,
or re-press it with steam for a better shape.
If it’s still not right, consider removing and reattaching the binding.
Make sure you pin it well to prevent puckering.
With patience, you’ll get that flat finish you want!
Conclusion
Now that you’ve mastered the art of binding your quilt, can you feel the excitement building?
Each stitch holds the promise of warmth and comfort, but what if you could enhance your quilt even further?
With a few unique techniques, you can transform your project from simple to stunning. So, as you admire your finished work, ask yourself what creative twist you’ll add next.
Your quilting journey has just begun, and the best is yet to come. Binding a quilt opens up endless possibilities for creativity and personal expression in every piece you make.