How You Quilt With a Regular Sewing Machine in Steps
Ever feel overwhelmed trying to bring your quilting projects to life without a fancy, specialized machine? You’re not alone! Many people struggle with the idea that quilting requires expensive equipment or advanced skills.
But the truth is, quilting with a regular sewing machine is not only possible, it’s also incredibly rewarding. If you’ve ever wished for a simple guide to get started, you’re in the right place.
To quilt with a regular sewing machine, start by choosing durable fabrics like quilting cotton and gather essential tools such as a rotary cutter and quilting foot.
Prepare your quilt sandwich by layering your top fabric, batting, and backing.
Set up your machine with the right needle and stitch length.
Get familiar with basic stitching techniques, and practice free motion quilting for creative designs.
If you want tips on binding and caring for your quilt, keep going!
Key Takeaways
- Choose suitable fabric types like quilting cotton and pre-wash to ensure durability and prevent shrinkage.
- Gather essential tools, including a sewing machine with a walking foot, rotary cutter, and quilting ruler.
- Prepare a quilt sandwich by layering top fabric, batting, and backing. Make sure you have the right weight and that everything is properly aligned.
- Set up your machine with the correct needle, stitch length, and tension. This helps you get the best quilting results.
- After quilting, care for your quilt by washing gently and storing it in breathable materials. This will help prevent damage over time.
Choosing Fabric for Quilting With a Regular Sewing Machine
When you’re choosing fabric for quilting with a regular sewing machine, it’s crucial to contemplate both quality and compatibility.
Start with fabric color schemes; pick colors that complement each other, creating a cohesive look. Think about how different shades interact. Contrast can add depth, while harmonizing colors can provide a soothing effect.
Start with complementary colors to create a cohesive look; explore contrasts for depth and harmonizing shades for a soothing effect.
Next, focus on fabric texture considerations. Different textures can influence the way your quilt feels and drapes. Cotton is a popular choice for its durability and ease of use, but don’t shy away from experimenting with blends or specialty fabrics.
Just make sure that the textures you choose work well together, as this can impact your sewing experience.
Ultimately, balancing these elements will not only improve your quilt’s visual appeal but also make the sewing process smoother.
Enjoy the journey of selecting fabrics that inspire your creativity!
Essential Tools for Quilting With a Regular Sewing Machine
Quilting with a regular sewing machine is totally doable—you just need the right tools to make the process smooth and enjoyable. First off, it helps to have a sewing machine that’s up for the job, but don’t worry, you don’t need anything fancy to get started. The key is to gather a few essential accessories and know which fabric types work best for quilting.
Once you’ve got your basics, everything else falls into place. Let’s talk about what you’ll need so you can jump right into your quilting adventure with confidence.
Sewing Machine Selection Tips
Selecting the right sewing machine is essential for a successful quilting experience. Start by considering different sewing machine types, like mechanical, electronic, and quilting machines. Each has unique benefits.
For example, quilting machines often come with a larger throat space, which makes it easier to maneuver your fabric. Look for specific quilting machine features such as an adjustable stitch length, free-motion capability, and a walking foot. These features can greatly improve your quilting process.
Don’t forget to check for good feed dogs, since they help with fabric movement. Ultimately, choose a machine that feels comfortable to use and meets your quilting needs. That way, you’ll enjoy every step of your quilting journey.
Happy sewing!
Must-Have Quilting Accessories
A well-equipped sewing space boosts your quilting experience, especially if you’re using a regular sewing machine.
Start with quilt rulers and rotary cutters for precise cutting. You’ll also want quality fabric scissors for trimming threads and fabric edges.
Quilting mats provide a solid surface for cutting and measuring, making your work easier. Don’t forget quilting clips to hold layers together without damaging the fabric.
Seam guides help you maintain consistent stitching, while marking pens let you plan your designs with ease.
Finally, pay attention to thread selection. Using the right thread can make all the difference in your quilt’s durability and appearance.
With these must-have accessories, you’ll set yourself up for quilting success!
Essential Fabric Types
Choosing the right fabric is crucial for successful quilting, and there are three essential types you’ll want to take into account.
First, quilting cotton is a go-to choice due to its medium fabric weight, vibrant color selection, and excellent texture variety. It holds patterns well, making pattern coordination a breeze.
Next, consider fabric blends, which combine cotton with other fibers for unique textures and durability.
Finally, specialty fabrics, like batiks or flannels, can add depth and interest to your quilts.
Don’t forget to pre wash fabrics to avoid shrinkage and guarantee colorfastness.
With the right combination of these fabrics, your quilting projects will shine!
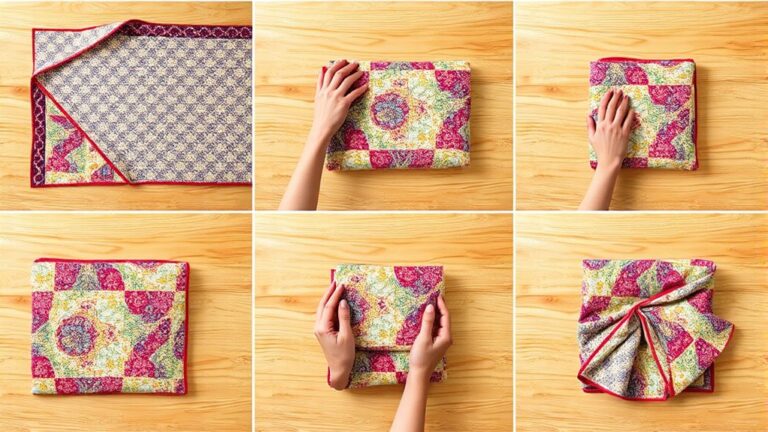
Preparing Your Quilt Sandwich: Layering Explained
Getting your quilt sandwich ready is a really important step if you want your project to turn out well. First, you’ll want to pick fabric layers and batting that complement your design—make sure they feel right together and suit your vision. Once you’ve got your materials, let’s chat about some simple layering techniques that will help you get started with confidence.
Choosing Your Fabric Layers
In the process of creating a quilt sandwich, selecting the right fabric layers is essential for achieving a beautiful and durable quilt. Start by choosing your top and backing fabrics wisely.
Look for fabric combinations that complement each other in color and pattern, enhancing the overall design. Consider the fabric weight, too; heavier materials may add bulk and affect how your quilt drapes.
Lightweight cottons are often ideal for both the top and backing, providing ease of handling during quilting. Always pre-wash your fabrics to prevent shrinking later.
Proper Batting Selection
While selecting the right batting is essential for your quilt’s overall feel and durability, understanding the various types can make the process easier.
You’ll find that batting types include cotton, polyester, and blends, each offering unique benefits. Cotton provides a soft, breathable finish, while polyester is more resilient and can withstand frequent washing.
Blends combine the best of both worlds, providing warmth and durability.
Next, consider batting thicknesses. Thicker batting gives a loftier look, perfect for quilts meant to be cozy.
Thinner options create a flatter finish, ideal for detailed quilting. Assess your project’s needs, and choose a batting type and thickness that aligns with your vision.
Your quilt will thank you for the thoughtful selection!
Layering Techniques Explained
Creating a quilt sandwich is a crucial step in the quilting process, as it sets the foundation for your design.
To start, lay out your backing fabric right side down on a flat surface.
Next, add your batting on top, smoothing out any wrinkles.
Finally, place your quilt top right side up.
This layering technique guarantees that your quilt sandwich is stable and ready for quilting.
To keep everything in place, use safety pins or basting spray, securing the layers alongside without shifting.
Make certain to check for any puckering or misalignment.
Once your layers are secure, you’re ready to move on to the fun part: quilting!
Mastering these layering techniques will make your quilting experience smoother and more enjoyable.
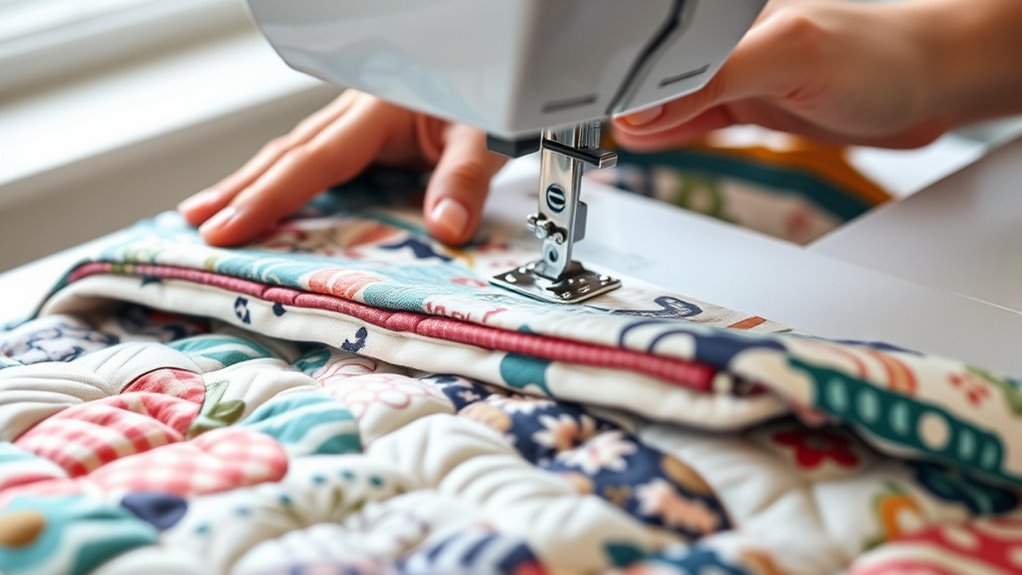
Set Up Your Sewing Machine for Quilting
Before diving into your quilting project, it’s essential to properly set up your sewing machine to guarantee smooth stitching and great results.
Start by selecting the right needle type; a quilting needle works best for thicker layers. Adjust your stitch length to around 2.5 to 3.0 for standard quilting patterns.
Selecting the right needle type and adjusting your stitch length are crucial for successful quilting.
Check your thread tension, ensuring it’s balanced for even stitches. Attach a quilting foot to help guide the fabric more effectively.
Make sure your machine settings are optimized for quilting. If you’re unsure, refer to your manual for specifics.
Pay attention to fabric feed, too. A walking foot can help manage multiple layers.
Finally, don’t forget about machine maintenance. Clean your machine and oil it regularly to keep it in top shape.
Taking these steps will set you up for success and make your quilting experience enjoyable and efficient.
Key Basic Quilting Techniques to Begin Your Journey
Now that your sewing machine is all set up, let’s talk about the must-have tools and some basic stitching techniques you’ll want to know. Getting comfortable with these essentials is going to make your quilting journey a lot smoother. Plus, once you’ve got the right tools and a few handy skills under your belt, you’ll be amazed at how quickly you can start creating beautiful quilts.
Essential Tools For Quilting
Starting your quilting journey requires a few essential tools that make the process smoother and more enjoyable.
Having the right quilting tools and fabric selection can greatly improve your experience.
Here’s a handy table to guide you through the basics:
| Tool | Purpose |
|---|---|
| Rotary Cutter | For precise fabric cutting |
| Cutting Mat | Protects surfaces while cutting |
| Quilting Ruler | Guarantees accurate measurements |
| Safety Pins | Holds layers together while sewing |
| Seam Ripper | Fixes mistakes easily |
With these essential tools, you’ll feel more confident in creating beautiful quilts.
Be sure to invest in quality materials to boost your quilting projects and enjoy the process!
Basic Stitching Techniques
Mastering basic stitching techniques is essential for any quilter enthusiastic to create beautiful pieces.
Start by familiarizing yourself with basic stitch types like straight, zigzag, and decorative stitches. Each type serves a specific purpose, whether it’s for piecing fabric or adding flair to your quilt stitch patterns.
Practice using a straight stitch for seams, making sure your fabric edges align perfectly.
Experiment with zigzag stitches to prevent fraying on raw edges. As you gain confidence, try decorative stitches to improve your design.
How to Create Accurate Quilt Blocks?
Creating accurate quilt blocks is essential for achieving a polished final product, and there are several key steps you can follow to guarantee precision.
Start by verifying you have accurate measurements and focus on consistent fabric cutting. Here are three important steps to master:
- Block Alignment: Always check that your blocks align perfectly before sewing. This verifies your design placement will look cohesive.
- Seam Allowance: Use a consistent seam allowance, typically ¼ inch, to maintain pattern consistency across all blocks.
- Pressing Techniques: After sewing, press your seams open or to one side, depending on your design. This helps in achieving a flat block, improving overall accuracy.
Tips for Free Motion Quilting on a Standard Machine
While free motion quilting on a standard machine can seem challenging, it’s a rewarding technique that allows for creativity and expression. To start, make sure your machine is set up properly.
Lower the feed dogs and use a free motion foot, which gives you full control over the fabric. Practice different free motion techniques on scrap fabric before diving into your quilt project.
Lower the feed dogs and equip your machine with a free motion foot for ultimate fabric control; practice on scraps before starting your quilt.
This will help you get comfortable with the movement. Don’t forget to make necessary tension adjustments. A balanced tension will keep your stitches even and prevent any puckering.
Test your stitching on scraps to confirm the tension is just right, adjusting as needed. Furthermore, maintain a steady speed while moving the fabric; this will help achieve consistent results.
Finally, remember to breathe and enjoy the process. Your creativity shines through in every stitch!
How to Address Quilting Issues Before Binding Your Quilt
Before you bind your quilt, it’s important to address any quilting issues that might affect its final appearance. Failing to do so can lead to regrets later.
Here are three key areas to check:
- Quilt Tension: Verify your quilt tension is balanced. Uneven tension can cause puckering or loose stitches, so adjust as needed.
- Stitch Length: Review your stitch length. Consistent stitch length is vital for a polished look. Aim for a length between 2.5 to 3.0 mm for most quilting.
- Thread Quality: Use high-quality thread to avoid fraying and breaking. This guarantees your quilt holds together well over time.
Binding Your Quilt: Final Touches
After addressing any quilting issues, you’re ready to move on to binding your quilt, which adds a polished finish and secures the edges.
Start by choosing your favorite binding techniques, like straight or bias binding, depending on the quilt’s design. Cut your binding strips and join them, ensuring they’re long enough to wrap around the edges.
Next, attach the binding to the front of the quilt, aligning it with the edges. Use a ¼-inch seam allowance to sew it down.
When you reach a corner, fold the binding to create a mitered edge for a neat look.
Once you’ve sewn all the way around, fold the binding over to the back and secure it with clips.
Finally, stitch it in place by hand or machine for those finishing touches.
Your quilt is now complete, ready to showcase your hard work!
Caring for Your Finished Quilt: Maintenance Tips
Caring for your finished quilt is essential to keep it looking beautiful for years to come.
Proper quilt cleaning and storage solutions will help maintain its vibrancy and integrity.
Here are three key tips to follow:
1. Regular Cleaning:
Wash your quilt in cold water on a gentle cycle, using a mild detergent.
Avoid bleach to prevent fading.
2. Drying:
Air-dry your quilt flat or hang it up to avoid distortion.
If you use a dryer, set it on low heat and remove it while slightly damp to prevent shrinkage.
3. Storage Solutions:
When not in use, store your quilt in a breathable cotton bag or wrap it in acid-free tissue paper.
Avoid plastic bags, as they can trap moisture and cause mildew.
Frequently Asked Questions
Can I Quilt Without a Walking Foot on My Machine?
Absolutely, you can quilt without a walking foot! Picture your fabric gliding smoothly under the needle, as you experiment with various quilting techniques.
Adjust your machine settings to accommodate different stitch types, like straight or zigzag, and choose fabrics that won’t shift too much. Just keep an eye on your tension and take your time.
With a little practice, you’ll create beautiful quilts even without that special foot!
What Type of Thread Is Best for Quilting?
For quilting, you’ll want to use 100% cotton thread or polyester thread types. Cotton’s natural fibers provide stability, while polyester offers strength and flexibility.
Pay attention to your thread tension; too tight or too loose can lead to puckering or thread breakage.
Test different threads on scrap fabric to find what works best for your project.
Ultimately, it’s about finding the right balance for a smooth and enjoyable quilting experience.
How Do I Fix Skipped Stitches While Quilting?
To fix skipped stitches while quilting, check your thread tension first; it might be too tight or loose.
Make sure you’re using the right needle size for your fabric choice. Using a needle that’s too small can cause issues.
Regular machine maintenance is essential, so clean out any lint and oil moving parts.
Finally, try different thread types, as some work better with specific fabrics.
Adjust these elements, and you’ll likely see an improvement.
Can I Use a Regular Needle for Quilting?
You can use a regular needle for quilting, but it’s not always the best choice.
A quilt needle, designed specifically for multiple layers, can help prevent skipped stitches and fabric puckering.
You’ll find that a larger needle size, like 90/14 or 100/16, works better for thicker fabrics.
How Do I Clean My Sewing Machine After Quilting?
To clean your sewing machine after quilting, start by unplugging it.
Remove the throat plate and clean out any lint or thread debris. Check the bobbin area and verify thread tension is adjusted properly.
Wipe down the exterior with a soft cloth. Don’t forget to oil moving parts as per your machine’s manual for ideal machine maintenance.
Regular cleaning keeps your machine running smoothly and improves your quilting experience.
Conclusion
You’ve journeyed through the world of quilting with your trusty sewing machine, much like a hero in a craft saga.
With your quilt sandwich layered and your techniques sharpened, you’re ready to create a masterpiece. Just remember, every stitch tells a story, and every quilt holds memories.
As you bind and care for your creation, think of it as wrapping a warm hug around your heart.
Now, go forth and let your creativity soar as you quilt with a regular sewing machine!