Mastering Applique for Quilters: A Step-by-Step Guide
If you’ve ever felt frustrated trying to get your appliqué just right—whether your edges fray, your shapes look uneven, or your fabrics don’t quite pop—you’re not alone. Many quilters struggle to master appliqué, even after years of practice.
It’s a common challenge, but with the right guidance and tools, you can achieve beautiful results that truly make your quilts shine.
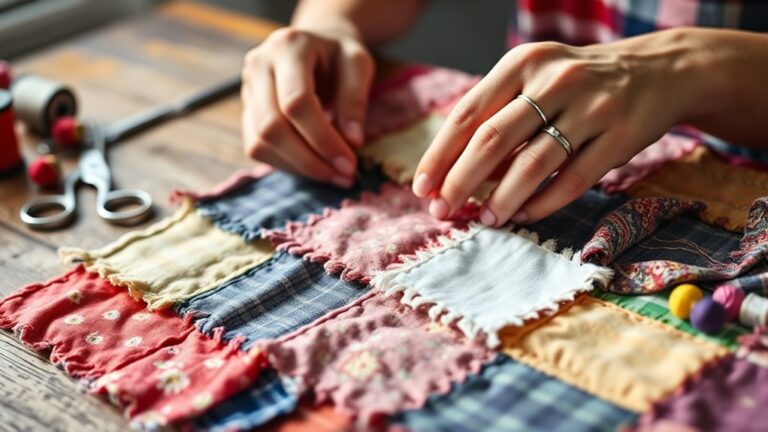
To master appliqué, start by selecting fabrics that reflect your style and coordinate well. You’ll need essential tools like sharp scissors, fusible web, and quality threads.
Prepare your fabric by washing, pressing, and cutting accurately. Investigate various techniques, from hand stitching to machine appliqué, and add dimension with creative layering.
If you run into issues, there are simple fixes. Continue to examine tips for unique designs and finishing touches to enhance your quilts.
Key Takeaways
- Choose fabrics thoughtfully by considering color combinations, seasonal themes, and texture for depth in your appliqué projects.
- Use essential tools like sharp scissors, fusible web, and quality threads. This will help ensure precision and ease during the appliqué process.
- Master cutting and ironing techniques to achieve accurate, flat fabric pieces. Always start with high-quality materials for the best results.
- Explore various appliqué techniques, such as machine and hand stitching. These different methods let you create unique designs with a range of finishes.
- Add dimension with layering, embellishments, and textured stitching. Doing so can really enhance the visual interest of your finished appliqué projects.
Choosing Fabrics for Appliqué Projects
When choosing fabrics for appliqué projects, start by considering three key factors: color, pattern, and texture. Think about fabric color combinations that resonate with your personal style.
Are you drawn to vibrant hues or muted tones? Next, examine print patterns. Seasonal themes can inspire choices, whether it’s florals for spring or warm plaids for fall.
Don’t overlook texture considerations; different fabrics can add depth and interest to your project. For instance, a smooth cotton paired with a textured linen can create a striking contrast.
Furthermore, consider the fabric weight. Lighter fabrics might work better for intricate details, while heavier ones provide stability.
Lastly, focus on coordinating colors to guarantee harmony throughout your appliqué. When sourcing your fabrics, keep these elements in mind.
With thoughtful selections, you’ll create beautiful, cohesive projects that truly reflect your artistic vision.
Essential Tools for Appliqué Quilting
To make beautiful appliqué quilts, having the right tools really makes a difference. You’ll find that things like cutting mats and fabric adhesives aren’t just helpful—they’re essential for getting great results. Each tool has its own special job to do, and together, they can make your quilting projects a lot easier and more enjoyable. So, let’s take a closer look at the must-have essentials that can help you get the most out of your appliqué quilting experience.
Must-Have Tools
While diving into the world of appliqué quilting, having the right tools can make all the difference in achieving a polished finish.
Essential tools include sharp scissors for precise cutting of various fabric types, and fusible web for easy application of your design inspiration.
You’ll also need quality threads, tailored to different fabric weights, to improve your stitching methods.
Here’s a quick overview of must-have tools:
| Tool | Purpose | Considerations |
|---|---|---|
| Scissors | Cutting fabric types | Sharpness, size |
| Fusible Web | Adhering pieces | Weight, ease of use |
| Thread | Stitching and embellishments | Color combinations |
| Iron | Pressing layouts and seams | Heat settings |
These tools will support your layout strategies and embellishment options effectively.
Fabric and Adhesives
Choosing the right fabric and adhesive is crucial for successful appliqué quilting. Start by selecting fabric types that suit your project, considering fabric weights and textures.
Cotton blends work well due to their durability and ease of handling. Regarding adhesive options, you’ll find various adhesive brands offering different strengths and applications.
For lightweight fabrics, use a spray adhesive, while heavier fabric blends might require a fusible web. Don’t forget about color coordination; vibrant fabric prints can improve your design, but make sure they complement each other.
Finally, always test your adhesive on fabric scraps to confirm compatibility and effectiveness before diving into your main project. This way, you’ll achieve beautiful, long-lasting results.
Preparing Your Fabric: Cutting and Ironing
When you’re getting ready to appliqué, it’s really important to start with high-quality fabrics. The better your fabric, the better your finished project will look and feel. Plus, working with good materials just makes the whole process more enjoyable.
Next up, let’s talk about cutting. Accurate cutting techniques are a game changer! You want your pieces to fit together perfectly, so taking your time here makes a big difference. Don’t rush—measure twice and cut once.
Selecting Quality Fabrics
As you immerse yourself in the world of applique, selecting quality fabrics is essential for achieving stunning results.
Here are key factors to ponder:
- Fabric Types: Choose cotton or blends for durability and ease of handling.
- Color Combinations: Opt for palettes that improve your design; reflect on seasonal themes for inspiration.
- Texture Selection: Mix smooth and textured fabrics to create depth; this adds interest to your project.
- Print Scale: Balance larger prints with smaller ones to avoid overwhelming your design while ensuring pattern mixing works harmoniously.
Don’t forget about fabric care. Pre-washing can prevent future shrinkage and help your project last longer.
Also, reflect on sustainable options to make environmentally friendly choices while sewing.
Quality fabrics really do set the stage for your beautiful creations!
Accurate Cutting Techniques
Accurate cutting techniques are essential for achieving clean lines and precise shapes in your applique projects.
Start by preparing your fabric: wash and press it to eliminate any wrinkles or shrinkage.
Next, use precise measurements to mark your cutting lines clearly. A rotary cutter and mat are invaluable tools for this step; they allow for smooth, straight cuts and minimize fabric fraying.
Always align your ruler with the cutting lines for accuracy. When you’re ready to cut, apply even pressure on the rotary cutter, moving steadily along the ruler.
After cutting, press the pieces again to guarantee they’re flat and ready for applique.
These techniques will set the foundation for a polished final product in your quilting journey.
Comparing Popular Appliqué Techniques
While there are numerous appliqué techniques available, each offers unique advantages that can improve your quilting projects.
Explore various appliqué techniques, each offering unique benefits to elevate your quilting projects.
Here’s a quick comparison to help you choose the right method:
- Hand Stitch Techniques: Perfect for detailed work, these allow for intricate designs but may take longer.
- Machine Appliqué Options: Fast and efficient, these methods often use fusible webbing for a secure hold.
- Reverse Appliqué: This unique style involves layering fabric, then cutting away the top layer to reveal a contrasting color underneath.
- Raw Edge vs. Needle Turn Methods: Raw edge creates a casual look, while needle turn provides a clean finish without visible stitches.
You might also consider using bias tape for additional flair.
Mastering Basic Appliqué Stitching
Once you’ve chosen your preferred appliqué technique, mastering basic appliqué stitching is the next step to improve your quilting skills.
Start by selecting your thread choices. The right thread can make your appliqué stitches pop against your fabric placement.
Experiment with different application methods, like hand or machine stitching, to see what fits your style best.
Utilize stitch variations to add texture and interest. Layering techniques can also create depth in your designs.
As you work, draw on design inspirations from nature or geometric patterns to guide your placements.
Don’t forget to reflect on embellishment ideas, such as beads or embroidery, to boost your project further.
Create Dimension With 3D Appliqué
If you want to make your 3D appliqué really pop, you’ll want to start with the right materials—they’re what give your project that amazing texture and depth. Once you’ve gathered everything you need, focus on layering your fabrics; stacking and arranging them carefully is the secret to building up your design and making it look truly three-dimensional. And don’t forget those last little touches! A few finishing details, along with some handy tips, can take your appliqué from nice to absolutely stunning.
Materials Needed For 3D
Creating stunning 3D appliqué requires a thoughtful selection of materials that bring your designs to life.
To achieve enchanting dimensional effects, consider these essentials:
- Diverse Fabric Textures: Use a mix of fabrics like felt, cotton, or satin for depth.
- Stabilizers: Opt for lightweight stabilizers to support your fabric during stitching.
- Batting: Incorporate thin batting between layers to improve 3D techniques.
- Adhesives: Select fabric glue or fusible web for secure layering methods.
With these materials, you can investigate various stitching strategies that uplift your work.
Draw on design inspiration from nature or art, and watch how your appliqué transforms into a vibrant, three-dimensional masterpiece!
Techniques For Layering Fabric
Here’s a quick guide to get you started:
| Technique | Description |
|---|---|
| Fusible Web | Bonds layers easily without bulk |
| Raw Edge Appliqué | Exposes edges for a frayed look |
| Stacked Layers | Create height with multiple fabric layers |
| Curved Layers | Add dimension by shaping the fabric |
| Textured Fabrics | Use various textures for visual interest |
Go ahead and experiment with these methods to improve your designs.
And remember, you don’t have to stick to just one—mix and match to create something truly unique!
Finishing Touches And Tips
How can you improve your appliqué projects with a touch of dimension?
3D appliqué adds depth and interest, transforming flat designs into eye-catching masterpieces.
Consider incorporating these techniques:
1. Layering Fabrics:
Use multiple fabric layers for a richer look.
2. Appliqué Embellishments:
Add buttons, beads, or ribbons to create visual interest.
3. Stitching Textures:
Experiment with different stitch types to emphasize shapes and edges.
4. Puff Paint or Batting:
Use puff paint or batting beneath layers to lift sections off the surface.
Unique Appliqué Design Tips
What makes a great appliqué design truly stand out? It’s all about blending creative motifs with seasonal themes and personal storytelling.
Start by drawing inspiration from nature, using playful designs that capture the essence of your surroundings. Experiment with geometric shapes to add structure and visual interest.
Drawing inspiration from nature, playful designs and geometric shapes infuse structure and charm into your appliqué creations.
Incorporating texture contrast can uplift your work; think about how different fabrics interact. Layering techniques not only improve depth but also allow you to play with color harmony.
Choose colors that complement one another, creating a cohesive look that draws the eye. Don’t shy away from cultural influences, as these elements can add a unique twist to your creations.
Whether you’re crafting a vibrant spring scene or a cozy winter tableau, keep these tips in mind to create stunning appliqué designs that resonate on multiple levels. Happy stitching!
How to Fix Common Appliqué Issues?
While creating beautiful appliqué designs is rewarding, you might encounter common issues that can disrupt your flow. Don’t worry! Here are some appliqué troubleshooting tips to help you fix those pesky problems.
1. Fraying Edges:
Use a tight zigzag stitch or a narrow blanket stitch to secure edges. This helps prevent fraying and keeps your design looking neat.
2. Puckering Fabric:
Make sure your fabric is pre-washed and ironed. If you still see puckering, try adjusting your machine’s tension settings.
3. Misaligned Pieces:
Always use a fabric marker to trace your outlines. Double-check each piece’s placement before you start sewing.
4. Skipped Stitches:
Check that your needle and thread are compatible. Often, simply switching to a new needle will solve this issue.
Finishing Your Appliqué Quilt
After tackling those common appliqué issues, you’re ready to wrap up your quilt and showcase your hard work.
Begin by selecting your binding techniques. Whether you prefer straight or bias binding, choose a fabric that complements your design.
Next, attach the binding with care, ensuring a neat finish.
Consider adding a quilt label to personalize your creation. Labels not only provide your name and date but also tell a story about your work.
Here’s a simple overview of the steps:
| Step | Details | Tips |
|---|---|---|
| Choose Binding | Straight or bias | Match to quilt design |
| Attach Binding | Sew along edges | Keep it even |
| Create Quilt Label | Include name and date | Use fabric marker or embroidery |
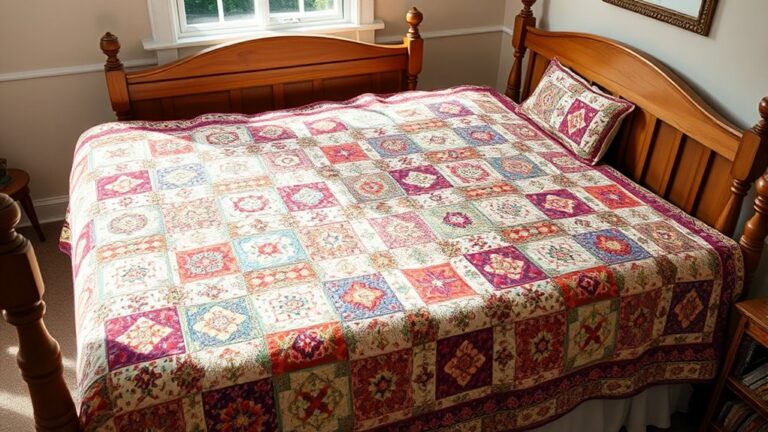
Top Appliqué Patterns for Your Next Project
When you’re ready to immerse yourself in your next appliqué project, you’ll find a wealth of patterns that can spark your creativity.
Here are some top suggestions to reflect on:
- Flower Motifs: Brighten your quilt with vibrant blooms, adding both color and texture.
- Seasonal Themes: Capture the essence of each season, from autumn leaves to spring flowers.
- Animal Shapes: Bring playful elements into your work with cute critters or majestic wildlife.
- Geometric Patterns: Create modern designs using abstract forms and sharp lines for a striking effect.
Don’t forget to investigate playful designs that evoke joy, nature scenes that reflect tranquility, and holiday appliqués that celebrate special occasions.
Incorporating cultural symbols can also add depth and meaning to your quilt, making it not just a craft, but a story.
Immerse yourself in these patterns, and watch your creativity flourish!
Frequently Asked Questions
Can I Use Different Fabric Types for Appliqué?
Yes, you can definitely use different fabric types for appliqué. Just keep fabric compatibility in mind. Some materials may not adhere well together.
Cotton blends, for example, work nicely with other cottons. Knits might require special techniques.
Experiment with layering techniques to achieve the look you want. By mixing fabrics, you can add texture and interest to your project.
Be sure to test your combinations before diving in.
How Do I Clean My Appliqué Quilt After Finishing?
To clean your appliqué quilt, start by checking the care label for specific instructions.
Generally, you can machine wash it on a gentle cycle with cold water. Use a mild detergent to protect your appliqué care.
Avoid bleach and fabric softeners, as they can damage the fabrics.
After washing, air dry your quilt to maintain its shape and color.
Regular quilt maintenance helps keep your appliqué looking fresh and vibrant for years.
What Is the Best Way to Store Appliqué Projects?
The best way to store appliqué projects is to keep them in a cool, dry place.
Use fabric organization techniques, like labeled bins or folders, to prevent wrinkles and damage.
You can also wrap your projects in acid-free tissue paper for added protection.
Avoid plastic bags, as they can trap moisture.
This way, you’ll guarantee your projects remain in great condition for future enjoyment and preservation.
Can I Machine Wash My Appliqué Quilts?
Yes, you can machine wash your appliqué quilts! In fact, about 70% of quilters opt for machine washing to maintain vibrant colors and patterns.
Just make sure to use gentle cycles and cold water to protect those delicate appliqué techniques.
Choosing high-quality, pre-washed fabric choices also helps prevent any shrinkage or distortion.
Always air dry or use a low heat setting to keep your quilt looking its best for years to come!
How Do I Choose Thread Colors for Appliqué?
To choose thread colors for appliqué, start by considering your fabric palette. For a cohesive look, match thread colors closely to your fabrics.
If you want to make elements pop, use contrasting thread techniques. Select colors that stand out against your appliqué.
Test a few choices on scraps to see how they look together. Remember, it’s all about enhancing your design while keeping it visually appealing.
Trust your instincts; you’ve got this!
Conclusion
Now that you’ve got the tools and techniques under your belt, it’s time to plunge in and make your appliqué dreams a reality.
Remember, practice makes perfect, so don’t be afraid to experiment and let your creativity shine. With a little patience and a sprinkle of imagination, you’ll be stitching up stunning designs in no time.
So, roll up your sleeves and get ready to craft something beautiful. After all, every journey in mastering applique for quilters begins with a single stitch!