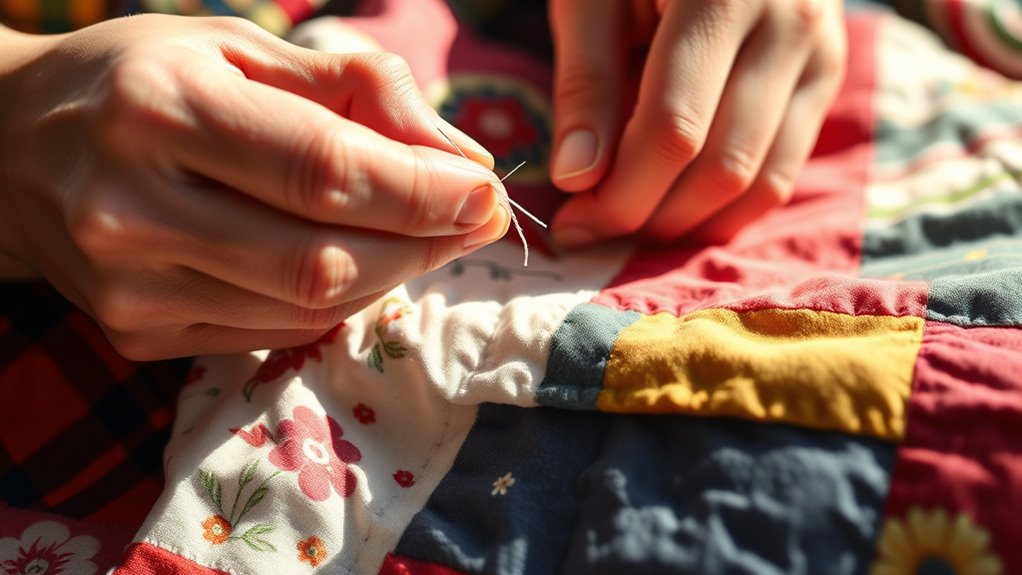
How Do You Tie a Quilt?
Quilting is a wonderful hobby, but figuring out how do you tie a quilt can leave even experienced crafters feeling confused or overwhelmed.
If you’ve ever struggled with bunching layers, uneven ties, or just not knowing where to start, you’re not alone. Many people want their quilts to look beautiful and last a long time, but the tying process can be a stumbling block.
Tying a quilt starts with layering your fabric: place the backing down, add batting, and lay the quilt top right side up.
Pin or baste the layers together to keep them aligned.
Choose a sturdy thread that matches your fabric, then space your ties evenly—about 6 to 10 inches apart—and make your knots.
Finish by trimming the ties for a neat look.
If you want tips on avoiding common mistakes, keep exploring!
Key Takeaways
- Layer the quilt top, batting, and backing smoothly. Make sure all layers are aligned and wrinkle-free before tying.
- Use sturdy thread or yarn along with a quilting needle. This helps secure the layers and adds to the quilt’s durability.
- Space your ties evenly, aiming for about 6 to 10 inches apart. This keeps things visually balanced and ensures structural integrity.
- Choose knot types like square or double knots. These knots help keep everything secure and look nice, too.
- Trim the tie ends to about half an inch. You can use a little fabric glue if needed to keep things neat and prevent unraveling.
Step-By-Step Guide: How to Tie a Quilt
Tying a quilt can be a rewarding and straightforward process.
Start by laying your quilt top, batting, and backing flat.
Make sure everything’s smooth to avoid any bunching.
Ensure all layers are flat and smooth to prevent any unwanted bunching during the tying process.
Next, choose your tying method.
Hand tying is popular for its simplicity and the personal touch it adds.
Grab a needle and thread, and cut lengths of thread about 12 inches long.
Begin at one corner, inserting the needle through all layers and pulling it until a small loop remains.
Create a knot by passing the needle through the loop, pulling tight to secure it.
These knots not only hold your quilt together but also add unique knot aesthetics that can improve its charm.
Space your ties about 6 to 8 inches apart for even distribution.
Continue this process across the entire quilt, ensuring each knot is secure.
Soon, you’ll have a beautifully tied quilt ready for use!
What Materials Do You Need to Tie a Quilt?
To get started with tying a quilt, you’ll want to gather a few basic supplies. First up is fabric—this is really the star of the show, so pick something that feels right for your project.
Next, you’ll need some sturdy thread or yarn for tying. Cotton or embroidery floss works well, but you can also use crochet thread if that’s what you have on hand. Don’t forget a sharp needle with an eye large enough for your thread; this makes the tying process so much easier.
You’ll also want a pair of good scissors for snipping thread and fabric. And of course, some safety pins or quilting pins will help keep your quilt layers from shifting around while you work.
Finally, it’s helpful to brush up on a few simple knotting techniques. Even just a basic square knot will do the trick for most quilts. With these materials and a little patience, you’ll be ready to tie your quilt in no time!
Essential Tools Required
Before you plunge into tying your quilt, you’ll need a few essential tools to guarantee the process goes smoothly.
Having the right quilting tools on hand not only makes your task easier but also improves your tying techniques.
Here’s a quick list of what you’ll need:
- Tying Thread: Choose a strong, durable thread that complements your quilt.
- Scissors: Sharp scissors help you cut threads cleanly and precisely.
- Tying Needle: A long, sturdy needle is vital for threading your tying material through layers.
With these essentials, you’re well-equipped to tackle your quilt.
Fabric Selection Tips
Selecting the right fabric is essential for a successful quilt, and you’ll want to take into account a few key factors. First, consider the fabric patterns; they can set the mood and style of your quilt.
Whether you prefer florals, geometrics, or solids, choose designs that complement each other. Next, think about color combinations. Harmonious colors create a cohesive look, while contrasting shades can add excitement and interest.
Don’t hesitate to mix different textures, too; this adds depth to your quilt. Finally, guarantee your fabric is durable and washable, as quilts take a lot of use.
Knotting Techniques Overview
When you’re ready to tie your quilt, having the right materials makes all the difference.
You’ll want to gather a few essentials to guarantee your knotting techniques are effective and your tying patterns look great.
Here’s what you need:
1. Thread: Choose a strong, durable thread that matches your fabric.
Cotton or polyester works well for most quilts.
2. Needles: Use a quilting needle, designed to handle multiple layers.
This makes the process smoother.
3. Scissors: Sharp scissors are vital for cutting your thread cleanly and accurately.
With these materials, you can investigate various knot types, like square knots or slip knots, to secure your quilt layers beautifully.
Happy quilting!
How to Prepare Your Quilt Layers for Tying
Getting your quilt layers ready for tying doesn’t have to be complicated. First, think about the materials you want to use—pick fabrics and batting that match both your design and how you plan to use the quilt. Once you’ve got your materials, it’s time to layer them. Lay everything out carefully, making sure the layers are smooth and lined up just right.
Before you start tying, gather the supplies you’ll need. Common items like sturdy thread, yarn, or embroidery floss, along with a large needle and scissors, will make the whole process go much more smoothly. Taking a little time to prep everything helps ensure your quilt turns out just the way you want.
Selecting Quilt Materials
Choosing the right materials is essential for preparing your quilt layers for tying.
Your fabric patterns and batting choices greatly influence the final look and feel of your quilt.
Here are three key aspects to evaluate:
1. Fabric Patterns: Select patterns that complement each other and suit your style.
Bold prints can add a vibrant touch, while softer patterns create a calming effect.
2. Batting Choices: Choose batting based on the intended use of your quilt.
Cotton batting offers breathability, while polyester provides durability and loft.
3. Backing Fabric: Don’t overlook the backing fabric.
It should be sturdy and match the overall aesthetic of your quilt.
With these selections, you’ll set a solid foundation for a beautiful tied quilt.
Layering Techniques Explained
Preparing your quilt layers is essential for a successful tying process. Start by choosing your layering fabrics, which typically include a backing, quilt batting, and the quilt top.
Lay the backing fabric right side down, making sure it’s smooth and wrinkle-free. Next, place the quilt batting on top of the backing. It’s a good idea to make it slightly larger than the backing to avoid uneven edges.
Finally, lay your quilt top right side up over the batting. Take a moment to smooth out any wrinkles so you have a nice, flat surface.
Pin or baste the layers together to keep them aligned while you tie. This method not only stabilizes your quilt but also helps achieve an even finish when you start tying.
Happy quilting!
Common Tying Supplies
Once you’ve layered your quilt, gathering the right supplies for tying is important.
The right tools make a big difference in your tying techniques and final result.
Here’s what you’ll need:
1. Tying Thread: Choose a strong, durable thread that complements your fabric choices.
Cotton or polyester threads work well.
2. Tying Needles: A long needle makes it easier to reach through the layers,
ensuring your knots are secure and even.
3. Scissors: Sharp scissors are essential for cutting your thread cleanly after tying,
giving your quilt a polished look.
With these supplies in hand, you’re ready to start tying your quilt,
ensuring it’s both beautiful and functional.
Happy quilting!
Choosing the Right Thread for Tying Your Quilt
When you’re ready to tie your quilt, selecting the right thread is essential for both durability and aesthetics. You’ll want to evaluate various thread types, such as cotton, polyester, or a blend.
Cotton thread is great for a natural look and feel. Polyester offers strength and resilience, while blends can provide the best of both worlds.
Next, think about thread colors. Choose a color that complements your quilt’s design, whether you want it to match or contrast, depending on the effect you want.
If you’re unsure about color, opt for neutral shades. These won’t overpower your fabric’s patterns and are usually a safe bet.
Additionally, make sure the thread weight is suitable for your quilt’s fabric. Heavier materials may require thicker thread types for stability.
Ultimately, your choice of thread improves both the functionality and visual appeal of your quilt. Don’t rush this decision—select wisely, and your quilt will shine!
How to Space Your Ties Evenly for a Balanced Look
After selecting the right thread, the next step is to confirm your ties are spaced evenly for a balanced look.
Proper tie placement is vital for achieving visual balance in your quilt.
Proper tie placement is essential for creating visual harmony and enhancing the overall beauty of your quilt.
Here’s how to do it:
1. Plan Your Layout:
Before you start tying, lay out your quilt and decide where you want each tie.
A good rule is to space them about 8-10 inches apart, depending on your design.
2. Use a Measuring Tool:
Grab a measuring tape or a ruler.
Measure the distance between each tie to guarantee consistency.
Mark these spots lightly with a fabric pencil for guidance.
3. Check for Symmetry:
Step back frequently to assess your work.
Make sure the ties are evenly distributed across the quilt, enhancing its overall appearance.
Choose the Right Knot for Tying Your Quilt?
Selecting the right knot for your quilt really matters—not just for how it looks, but also for how well it holds up over time. Think about it: the type of knot you use, how tightly you tie it, and even the materials you’re working with all come into play. Each of these little choices can make a big difference in making sure your quilt stays together and looks great, too.
Types Of Quilt Knots
While you might think all quilt knots are created equal, selecting the right one can make a significant difference in your quilt’s durability and appearance.
Here are three popular types of quilt knots to contemplate:
- Square Knot: Known for its knot durability, it’s simple to tie and stays secure, making it ideal for beginners.
- Bowline Knot: This knot offers excellent knot aesthetics, creating a neat loop that adds visual interest, perfect for decorative quilts.
- Double Knot: A great choice for securing layers, it improves knot durability and guarantees your quilt withstands wear and tear.
Choosing the right knot not only affects how your quilt looks but also how well it holds up over time.
Happy quilting!
Knot Tension Importance
Selecting the right knot is only part of the equation. Knot tension also plays a significant role in how your quilt turns out.
When you tie your knots, you need to verify they’re snug but not overly tight. Proper knot tension affects knot strength, keeping your quilt secure without causing fabric bunching.
If your knots are too loose, they might come undone. On the other hand, overly tight knots can damage the fabric.
Pay attention to knot placement as well. Strategically placing knots can help distribute tension evenly across your quilt.
This balance improves the overall appearance and durability of your project, guaranteeing it stands the test of time. So, focus on both knot strength and tension for the best results.
Material Considerations For Knots
In relation to tying your quilt, the type of material you use for your knots can make a significant difference.
Choosing the right knot impacts both knot durability and fabric compatibility.
Here are three key considerations:
1. Thread Material: Opt for strong threads like cotton or polyester for lasting knots.
2. Fabric Type: Confirm your knot material complements the quilt fabric.
For instance, delicate fabrics may require softer threads to avoid damage.
3. Knot Style: Select a knot style that suits your materials.
Simple knots work well for heavier fabrics, while decorative knots improve lighter materials.
Finishing Your Ties: Tips for a Neat Look
To achieve a polished finish on your quilt ties, focus on consistency and neatness.
Start by selecting a knot style that complements your quilt’s design.
Simple bow knots or more intricate double knots can add character while remaining functional.
Whichever style you choose, make certain you tie them tightly but not so tight that they distort the fabric.
Next, trim the ends of the ties to an even length, about half an inch or to your preference.
Trim the ends of your ties to an even length, about half an inch, for a polished finish.
This creates a clean look and prevents fraying.
For an extra touch, consider using fabric glue on the ends to secure them if you’re worried about unraveling.
Finally, step back and inspect your work.
Adjust any ties that appear uneven or out of place.
These finishing touches make a significant difference, giving your quilt a professional and cohesive appearance.
Happy quilting!
Common Mistakes in Quilt Tying
While tying a quilt can be a rewarding experience, it’s easy to make common mistakes that can affect the overall quality.
Here are three mistakes beginners often make:
1. Inconsistent Fabric Tension:
If you pull the fabric too tightly or leave it too loose, it can warp the quilt.
Aim for even tension for a neat finish.
2. Skipping Ties:
Not tying enough knots is a frequent oversight.
Be certain to secure your quilt at regular intervals to prevent shifting and guarantee durability.
3. Ignoring the Quilt Sandwich:
Overlooking the importance of a well-prepared quilt sandwich can lead to uneven ties.
Be certain your top, batting, and backing are properly aligned before you start.
How to Care for Your Tied Quilt
Caring for your tied quilt is vital for maintaining its beauty and longevity, especially since you’ve put so much effort into creating it.
To keep your quilt in top shape, regular quilt washing is important. Use a gentle cycle with cold water and a mild detergent to avoid fading and wear.
Always air-dry your quilt to preserve its texture and avoid shrinkage.
When it comes to storage solutions, make sure your quilt is stored in a cool, dry place. Avoid plastic containers, as they can trap moisture and lead to mildew.
Instead, opt for breathable cotton bags or acid-free tissue paper to wrap your quilt. If you need to fold it, place a layer of tissue paper between the folds to prevent creasing.
Different Techniques for Tying a Quilt
When you’re ready to tie your quilt, exploring different techniques can improve both its aesthetic and durability.
Here are three methods that blend creative tying with historical techniques:
- Traditional Knotting: This classic method involves tying off each layer with simple knots. It’s effective and straightforward, ensuring your quilt holds together well.
- Button Tying: For a unique touch, consider using buttons. Sew them through all layers at your tie points, adding both flair and security. This method recalls the craftsmanship of quilts from the past.
- Embroidery Ties: Incorporate decorative stitches or embroidery as you tie your quilt. This technique not only secures the layers but also adds a personal, artistic element that reflects your style.
Experimenting with these methods can make your quilt truly one-of-a-kind while providing the strength it needs to last for generations.
Happy tying!
Frequently Asked Questions
Can I Tie a Quilt Without a Sewing Machine?
Yes, you can definitely tie a quilt without a sewing machine! Start by choosing your fabric carefully; lightweight cotton works well.
Use hand tying techniques like knots or decorative ties to secure your layers. Cut your threads to an appropriate length, and make sure to evenly space your ties for a balanced look.
This method not only gives your quilt a personal touch but also improves its charm. Enjoy the process—it’s rewarding!
What Types of Quilts Are Best for Tying?
If you’re looking to tie a quilt, consider using tied quilts like comforters, rag quilts, or patchwork quilts. These quilt types work well for tying because they have layers that hold together nicely.
When you choose fabric choices like flannel or cotton, you’ll find they’re sturdy yet soft. Remember, the key is to pick fabrics that won’t fray easily.
This ensures your tied quilt remains durable and beautiful for years to come.
How Long Should My Ties Be?
Your tie lengths should generally be about 4 to 6 inches long. This gives you enough fabric to secure the quilt without being too bulky.
When considering fabric, keep in mind that thicker materials might require slightly longer ties for a secure hold. So, if you’re using heavier fabrics, aim closer to 6 inches.
Always test a few ties to find the perfect length that works for your quilt’s design and thickness.
Can I Use Yarn Instead of Thread?
Yes, you can absolutely use yarn instead of thread! Yarn offers several benefits, like added durability and a cozy look.
When tying your quilt, consider using various tying techniques, such as the classic square knot or simple double knot, to secure the yarn effectively.
Just make sure to choose a yarn that complements your fabric. You’ll create a unique texture and warmth, enhancing your quilt’s overall aesthetic while ensuring it’s well-constructed.
Is Tying a Quilt Faster Than Quilting?
Tying a quilt is like taking a shortcut through a beautiful park instead of hiking a mountain trail. It’s definitely faster than traditional quilting techniques, allowing you to complete your project in less time.
With tying, you secure layers quickly, enhancing quilt durability while adding charm. So, if you’re pressed for time or a beginner, tying’s your go-to method.
Welcome the efficiency and let your creativity flow!
Conclusion
Tying a quilt isn’t just a craft. It’s practically an art form that transforms fabric scraps into a cozy masterpiece!
With every knot, you’re weaving love and memories that can outlast time itself. So, grab your needle and thread, and let your creativity soar!
Remember, each tie is a stitch in the tapestry of your life, binding together moments like a superhero cape for your cherished memories.
In the end, your quilt will become a treasure—a legacy stitched with warmth and care. Tying a quilt truly makes every piece special and meaningful.